How To Submit A Preproduced Production Order to Traffic
Textual content is below video. To expand video click on the icon at the very bottom right of the video.
Preproduced Production Orders (click to open)
Submitting a Preproduced Production Order To Traffic
A Preproduced ad means that it is done and ready to go on the air with no editing required.
There can only be one ad per production order.
How To Create A Preproduced Production Order:
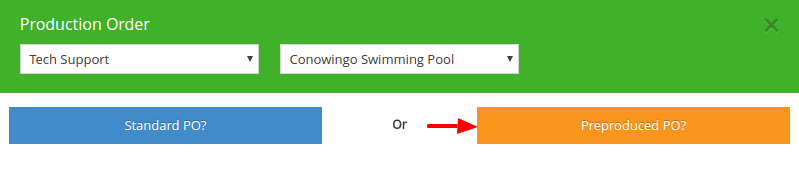
 On the left side of your screen, click on the green “New” button and then select “New PO”.
- In the right drop-down box at the top of the pop-up screen, choose which customer the production order is for.
- Click on the orange “Preproduced PO” button.
A Preproduced PO means that you already have an ad produced that needs NO editing what so ever and is 100% ready to go on the air!
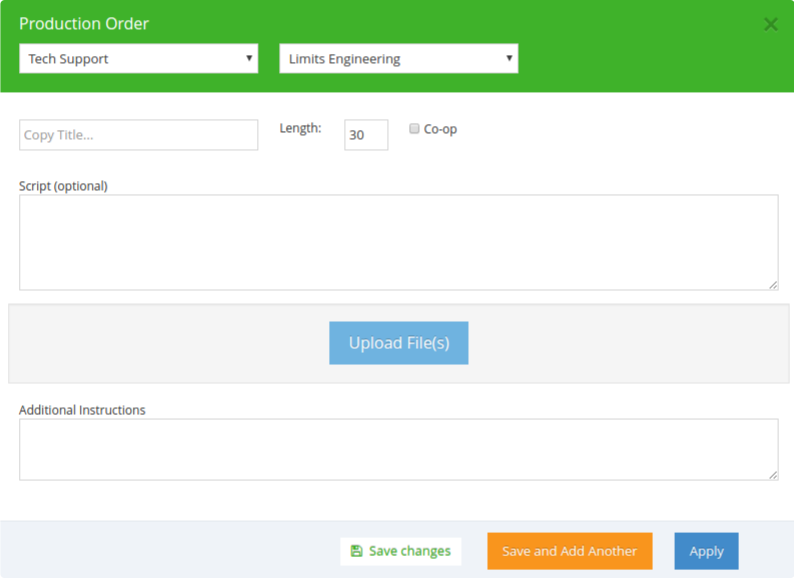
After clicking on the orange “Preproduced PO” button, complete the pop-up form with the following information:
- Create a specific title for your ad so you are able to easily find it in the future (a general date including a month and a year may help you)
- Select the length of the ad in the box to the right of the title: i.e. 30, 60, 90 and so on
- Check the “Co-op” button if that applies to this ad. (If you are unsure whether this is a co-op or not, ask your manager or traffic)
- The “Script” box is optional, but we highly recommend that you fill it in
- You will upload the audio file in the blue “Upload File(s)” button
- If there are any “Additional Instructions”, you may put that in the last text box
- If you have multiple ads for this customer that need to run, select the orange “Save and Add Another” button instead of the blue “Apply” button. If not, click the blue “Apply” button to send the Production Order to Traffic. (see image below)
After you click on the blue “Apply” button, the traffic order pop-up form opens.
You would then need to enter in the run dates and the station(s) the ad will run on. You can also add specific instructions for traffic in the instruction box.
The optional section of this form allows you to add the ISCI code, the daypart and the day of the week the ad will run.
Attach multiple spots to the traffic order by selecting that title from the drop down menu in the “Select a PO to add” field then click “Add to Rotation”
Finally, you can click the blue “Save Draft” button to come back to this traffic order at a later date or click the blue “Send To Traffic” button when complete.
Traffic will then assign a cart number, dubbing and then that commercial will go on air.
Traffic Order Actions (click to open)
Actions Available for Traffic Orders:
The “Actions” button is a large orange button that is located to the right of a customer
View/Edit Traffic – This is a quick way to access details in a traffic order and make changes. If you have already submitted the Traffic Order, you MUST use the “Report a Problem”
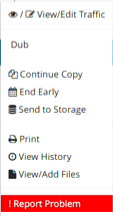 Dub – shows what ads are in dubbing and ready to go on air
Continue Copy – If a customer renews a contract and uses the same ads, you can use this to extend the run time of the copy in the system so you don’t have to remake the traffic order
End Early – This option allows you to alter the current schedule for the traffic order and end the ad cycle at an earlier time
Send to Storage – Here you can send your traffic orders to storage so you don’t lose old traffic orders (you may want to use this to store traffic orders for a customer with many traffic orders)
Print – Here you can print the Traffic Order to see the schedule for the ads
View History – This is a quick way to view past Traffic Orders for this customer
View/Add Files – Use this if you need to quickly add any files to your Traffic Order to make the process run more smoothly
Report Problems – Here will be the best place to report any issues. You are better off reporting an issue than trying to edit it. There is a chance an edit would go unnoticed.