Production & Traffic Order Training
Textual content is below video. To expand video click on the icon at the very bottom right of the video.
Understanding the Creative Process and Work Flow (click to open)
This Section Will Tell You What The Status of Each PO Means:
There are 2 ways you can view the status of the PO:
1. is with the status in tabs (first image below)
2. by the drop down menu (the second image below).
To switch between the two – click the ![]() button. It does not matter what option you choose, it just depends on how you want the screen to look. Most seem to like the tab mode that is in the first picture below.
button. It does not matter what option you choose, it just depends on how you want the screen to look. Most seem to like the tab mode that is in the first picture below.
If you don’t have ALL of the tabs/statuses below, don’t worry. This just means that your station does not use these steps.
Or
Different “Statuses” your production order can be in the production order assembly line:
“Active” – This status will allow you to see all production orders in “Copy Points”, “Copywriter”, “Approval”, “Production”, “Assigned”, and “Completed”. Again, if you don’t have all of these, don’t worry. It just means your company does not use those statuses in the system.
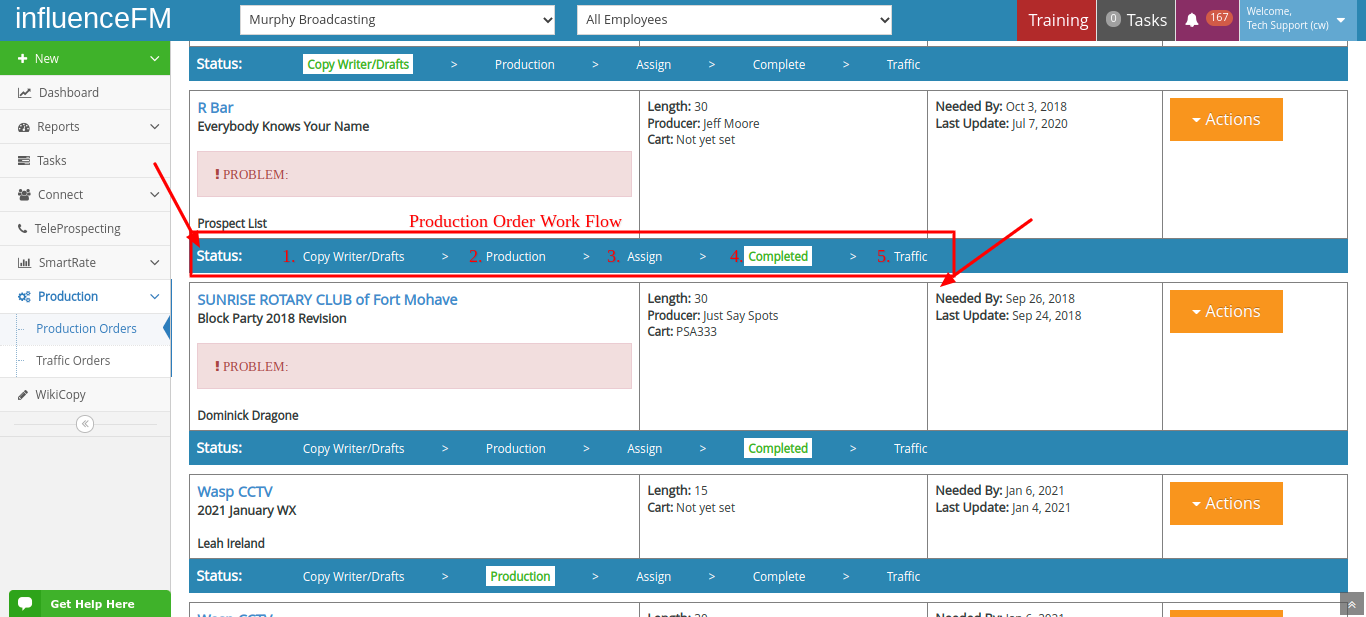
Production Order Work Flow
1. Copy Writer/Drafts: the rep or the copy writer creates the copy for the ad and then submits that ad to Production
2. Production: Production looks through the ad making sure all looks well and assigns that spot to talent
3. Assign: Once talent completes the ad, they submit that completed ad and an email goes back to the rep or copy writer letting them know that talent has completed the spot. The rep will let the customer know the ad has been completed and may give to the customer for review.
4. Completed: Once the spot is complete and ready to go to Traffic, the rep clicks on the Traffic tab and submits the order to Traffic.
5. Traffic:Once approval for the spot is received, select “Traffic” on the blue timeline at the bottom of that PO. A pop-up will appear. Here is where you will create your Traffic Order.

After the “Completed” status – this is where PO’s stop and are put onto a traffic order for the traffic department. Ultimately, all PO’s stop at “Completed” once they are done. Then they move on to be a part of a traffic order. Do not forget that you can have multiple PO’s on a traffic order. For instance, you may have 3 PO’s (or “commercials”, however you want to look at it) on a traffic order. This way you can instruct traffic. For example: Ad 1 plays 25% of the time, Ad 2 plays 25% of the time and the 3rd ad plays 50% of the time.
Do note: To EDIT or CHANGE a PO at any status you MUST click the orange “Actions” button and click on “report problem”. You can not edit the PO once it has been submitted. You must use the “Action” button and use the “report problem” feature. This may anger some people, but this is the only way things are tracked in history and also so everyone in the creative process gets an email of the changes that are made. It notifies the creative team that “Hey, this PO needs some changes”. We don’t want to edit on the fly. Otherwise, the creative department would not know what changes needed to be made and who needs to change it.
Standard Production Orders (click to open)
Making a Standard PO (Screen Shot at Bottom):
There is one ad per Production Order:
Tip: If there is ever an issue that you want to fix or adjust while the ad is getting produced you MUST click on the orange “Actions” button and choose “!Report Problem”. This is the ONLY way to edit a PO!
 On the left side of you screen, click on the green “New” button and then select the third option “New PO”
- In the right drop-down box at the top of the pop-up screen, choose which customer the production order is for
- You can either choose a “Standard PO” or a “Preproduced PO” For this example we are going to choose “Standard PO”. A Standard PO means that you need an ad produced while a Pre-produced PO means that you already have an ad produced that MAY OR MAY NOT need no more editing.
- Create a specific title for your ad so you are able to find it in the future (a general date including a month and a year may help you)
- Select the length, voice style and number of voices you need for this production order
- Choose the dates that you would like it written and produced by (If you don’t have the “write by” date field, it means your company does not have this turned on)
- Check the “Co-op” button if that applies to this ad. If there is confusion on whether this option needs to be selected, ask your manager or traffic
- You can leave the “Cart” option empty, traffic will take care of that if this is not your job
- Under “Talent” – you can request who you would like to have voice your ad
- Next is “Needs” – there are four check boxes for Jingle, Tag, Music Bed and other. Check all that apply to this ad.
- Anything that may help the talent or production in making this ad should be put in the “Instructions” box and, if applicable, in the “Pronunciations” box
- Under “Copy Points”, put down as much information as you can to help the copy writer create the ad you need (If you do not have a copy box field, it means your company has this turned off)
- Next is the copy box (If your company uses copywriters you may skip this step. However, if you are the one writing the copy, go ahead and put the copy in)
- If there are any “Additional Instructions” you may put that in the last text box on the form if you see fit
- Once you are ready, select “Apply” if you are ready to move on, or “Save Changes” to come back to it later
- If your company uses copywriters, your Production Order will now move to the “Copy Writer” stage. If your company does not use copywriters, then it will go to the production status. (If you open the “Copy Writer” tab at the top of the screen, you will see your production order. On the bottom of it, there will be a blue line showing what status the production order is in and what is next.)
- Once the copy writer is done writing the ad, the ad will move to the “Approval” status where you can read the script and make sure your customer likes the copy. Tip: You can click on the orange “Actions” button and email the copy to your customer.
- You will not need to do anything until it gets to the “Complete” stage. Once it gets here, you can listen to the ad and send it off to the customer for their approval.
- Once you have received approval, select “Traffic” on the blue timeline at the bottom of the PO.
- A pop-up will appear. Here you will create your Traffic Order.
- Under the “Percent” box, you will choose the variation between the ads running. (For example, if you had two adds, you would do 50% or if you had one ad, it would be 100%)
- Select the date range that these ads will be running for and the stations that the ads will be running on. If this has not already been selected, it is because your company has the feature turned off to set run dates and stations before the PO is completed
- Select the Daypart that these ads will be in and select what days of the week you would like them to play
- If you would like to add any other Production Orders to this Traffic Order, click on “Select a PO to add” in the drop down bar, select which PO you would like to add, then click “Add to Rotation”
- Now you can “Save Draft” to save for later or “Send to Traffic”
- Once sent to traffic, they will handle the next step and move it to “On Air”
(watch an additional training tutorial below)
Pre-produced Production Orders (click to open)
Making a Pre-produced PO (Pre-produced means that the ad is done and ready to go on the air):
There is one ad per Production Order:
 On the left side of your screen, click on the green “New” button and then select “New PO”
- In the right drop-down box at the top of the pop-up screen, choose which customer the production order is for
- You can either choose a “Standard PO” or a “Pre-produced PO”. For this example we are going to choose a “Pre-produced PO”. A Pre-produced PO means that you already have an ad produced that needs NO editing what so ever. It is 100% ready to go on the air!

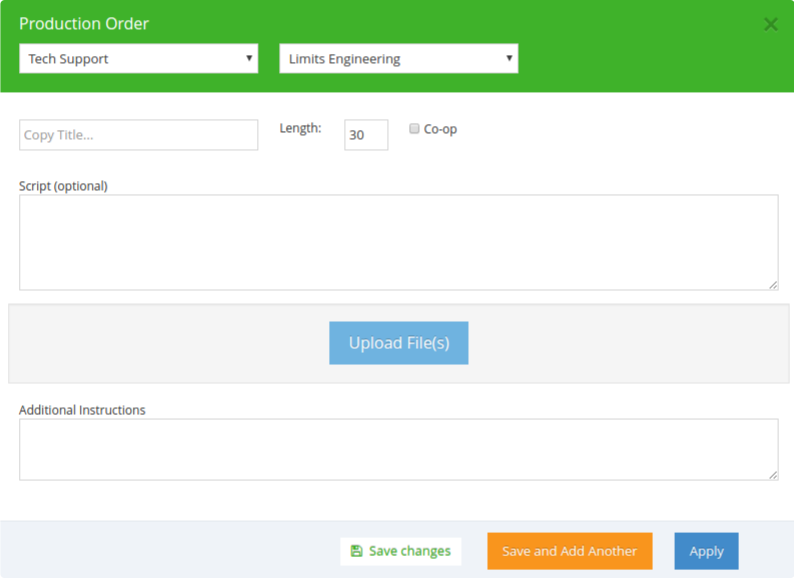
- Create a specific title for your ad so you are able to easily find it in the future (a general date including a month and a year may help you)
- Select the length of of the ad in the box to the right of the title: i.e. 30, 60, 90 and so on
- Check the “Co-op” button if that applies to this ad. If there is confusion on whether this option needs to be selected, ask your manager or traffic
- Even though the “Script” box is optional, we highly recommend that you fill it in
- You will upload the audio file in the blue “Upload File(s)” button
- If there are any “Additional Instructions” you may put that in the last text box, if you so choose to
- If there are multiple ads for this customer that need to run, select the orange “Save and Add Another” button instead of the blue “Apply” button. If not, click the blue “Apply” button to send the Production Order to Traffic.
Renewing a Traffic Order (click to open)
Renewing a Traffic Order:
One week before a Production Order is up for renewal, you will get an email warning you:
- On the left side of the screen, click on the “Production” button and choose the second option “Traffic Orders” in the drop down menu.
- Then you will select the “Expiring” tab on the top bar
- Click on the orange “Actions” button and select “Continue Copy”
- You can change the start and end date for the ads to run through
- Click the blue “Save” button

Production Order Actions (click to open)
Action Available for Production Orders:
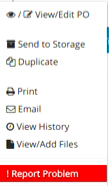
The large orange “Actions” button is located to the right of a customer
View/Edit PO – Here you can edit every detail of your PO and make changes if necessary.
If you have already submitted the PO, you MUST use the “!Report a Problem” so everyone working on the order knows there is a change that is needed.
 Send to Storage – Here you can send PO’s to storage so you don’t lose old production orders (you may want to use this to store PO’s for a customer with many PO’s)
Duplicate – This is an easy way to recreate a PO (this is helpful when you are on a busy schedule and need to make a similar PO from one you have done in the past) Also, if you need to make changes to and old PO, before deleting it, click the action button and select “duplicate” then make the changes on the new version.
Print – The print option allows you to have a physical copy of the details of your PO
Email – Here you can email your PO to your manager or anyone in the company
View History – This is a quick way to view past PO’s for this customer
View/Add Files – Use this if you need to quickly add any files to your PO to make the process run more smoothly
Report a Problem – If you have already submitted a PO, use this if you want to make a change to the PO. If you edit the PO, other people working on the PO probably won’t see it.
Traffic Order Actions (click to open)
Actions Available for Traffic Orders:
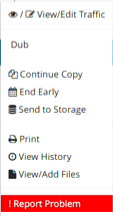
The “Actions” button is a large orange button that is located to the right of a customer
View/Edit Traffic – This is a quick way to access details in a traffic order and make changes. If you have already submitted the Traffic Order, you MUST use the “Report a Problem”
 Dub –
Dub –
Continue Copy – If a customer renews a contract and uses the same ads, you can use this to extend the run time of the copy in the system so you don’t have to remake the traffic order
End Early – This option allows you to alter the current schedule for the traffic order and end the ad cycle at an earlier time
Send to Storage – Here you can send your traffic orders to storage so you don’t lose old traffic orders (you may want to use this to store traffic orders for a customer with many traffic orders)
Print – Here you can print the Traffic Order to see the schedule for the ads
View History – This is a quick way to view past Traffic Orders for this customer
View/Add Files – Use this if you need to quickly add any files to your Traffic Order to make the process run more smoothly
Report Problems – Here will be the best place to report any issues. You are better off reporting an issue than trying to edit it. There is a chance an edit would go unnoticed.


