influence FM’s Connect Customer List
Textual content is below the video
Philosophy: Recommended Read (click to open)
Philosophy of influence FM’s CRM:
Sales is the HARDEST Job in the world! The idea behind the influence FM client list and calendar is to stay more organized. NEVER lose a client because of accidental neglect. Be a rock star sales professional and never forget a thing!
The number one rule when using the influence FM CRM (customer list and calendar) is for ALL of your customers to ALWAYS have a future appointment.
“How can I ALWAYS know what is next with my customers?” If you think about it, there is always a next step for your customers in radio sales; write copy, copy call, up sell, account servicing, change an order, cancel an order, stop in and say “hi”, etc. The most important thing to remember is that your future appointments are NOT set in stone and you can always adjust the dates, times and details of that appointment. Think of your future appointments as rough estimates. When do you think you MIGHT see that client and what you MIGHT talk about, unless, of course, it is a definite appointment you have set with your customer. As you get closer to that appointment, you will probably have a better idea of what you need to do for that customer. You can then adjust that appointment accordingly.
With analytical testing from influence FM data tools, it takes a rep, on average, 15-20 minutes in the morning and 15-20 minutes in the afternoon to perfectly organize their calendar. That information gets automatically generated into a sales report. With influence FM…NO MORE MANUAL SALES REPORTS!
Adding customers to your customer list (click to open)
Before you add a new customer, do a search in the top search bar to make sure the customer is:
- Not already owned by another rep.
- You are not creating a duplicate account.
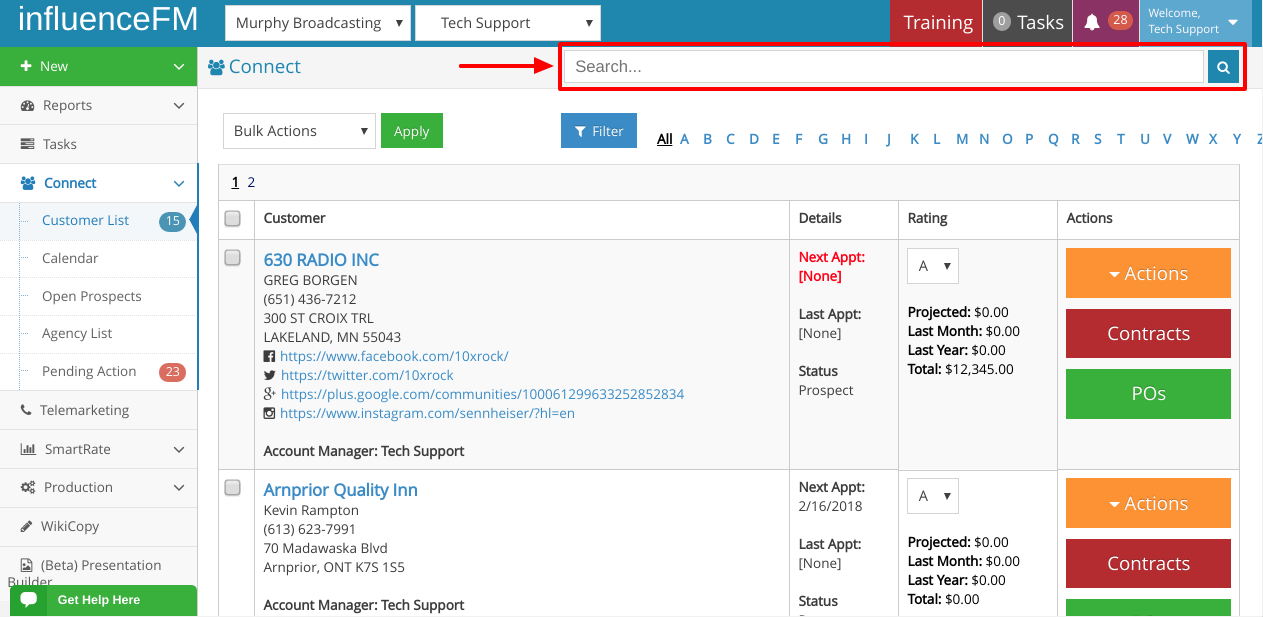
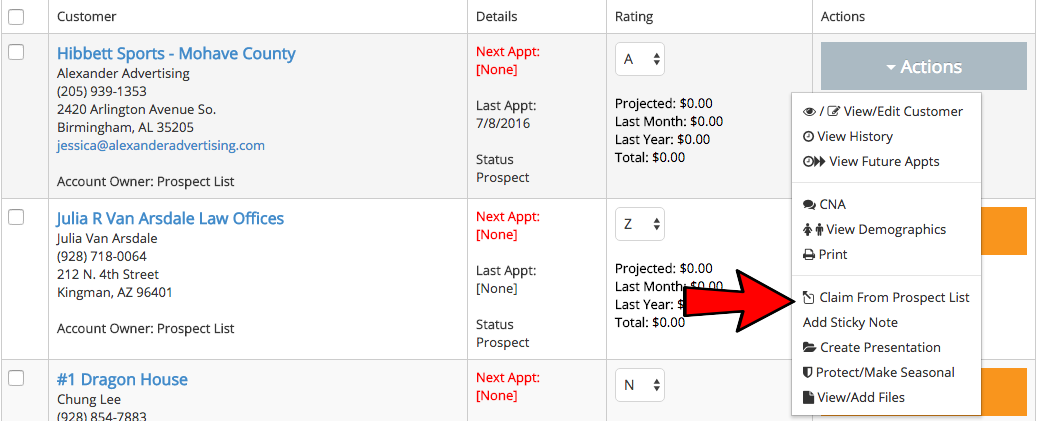
Claiming A Customer: If the customer is already in the system, claim it by clicking on the orange action button and select “Claim from Prospect List”
To add a new customer:
- Click on the big green button in the top left hand corner of the screen that says “New”

- Then click “New Customer” from the drop down menu.
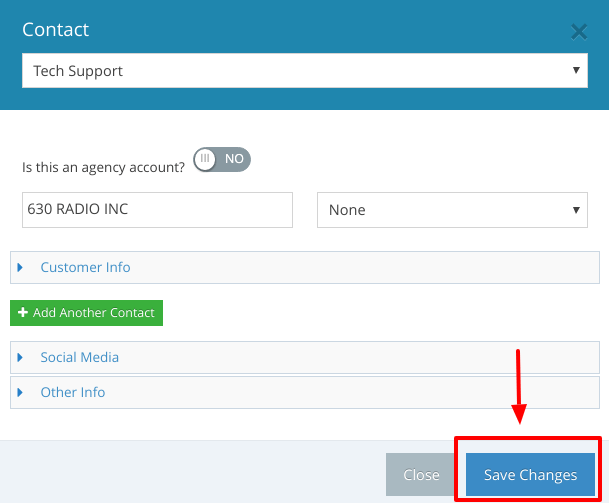
- Then a window will pop-up and the first option is to decide if this account is associated to an agency. If it’s not, please skip this step. If it is, click the button to turn to yes. This will then bring up a drop down menu that will let you select an agency. IMPORTANT: Your manager must have the agencies entered into the system before you will be able to select an agency. You can always edit this later.
- Fill out the customer’s company name and then select the product category type, i.e., if it is a landscaper select “landscaping”, if it is a baker select “baker” and so on. This is very important as influence FM integrates with 3rd party apps like Google maps and Google Calendar.
- Click on the blue toggle button below the customer name that says “Customer Info” . In this toggle, the only thing that is required is the first and last name. If you do not have this, simply put “N/A” in the first and last name field and you can come back and add the name at a later date. All other fields are optional.

Last: At the bottom – click the blue button that says “Save Changes”
(watch an additional video tutorial below)
Rating System & Customer List icons explained (click to open)
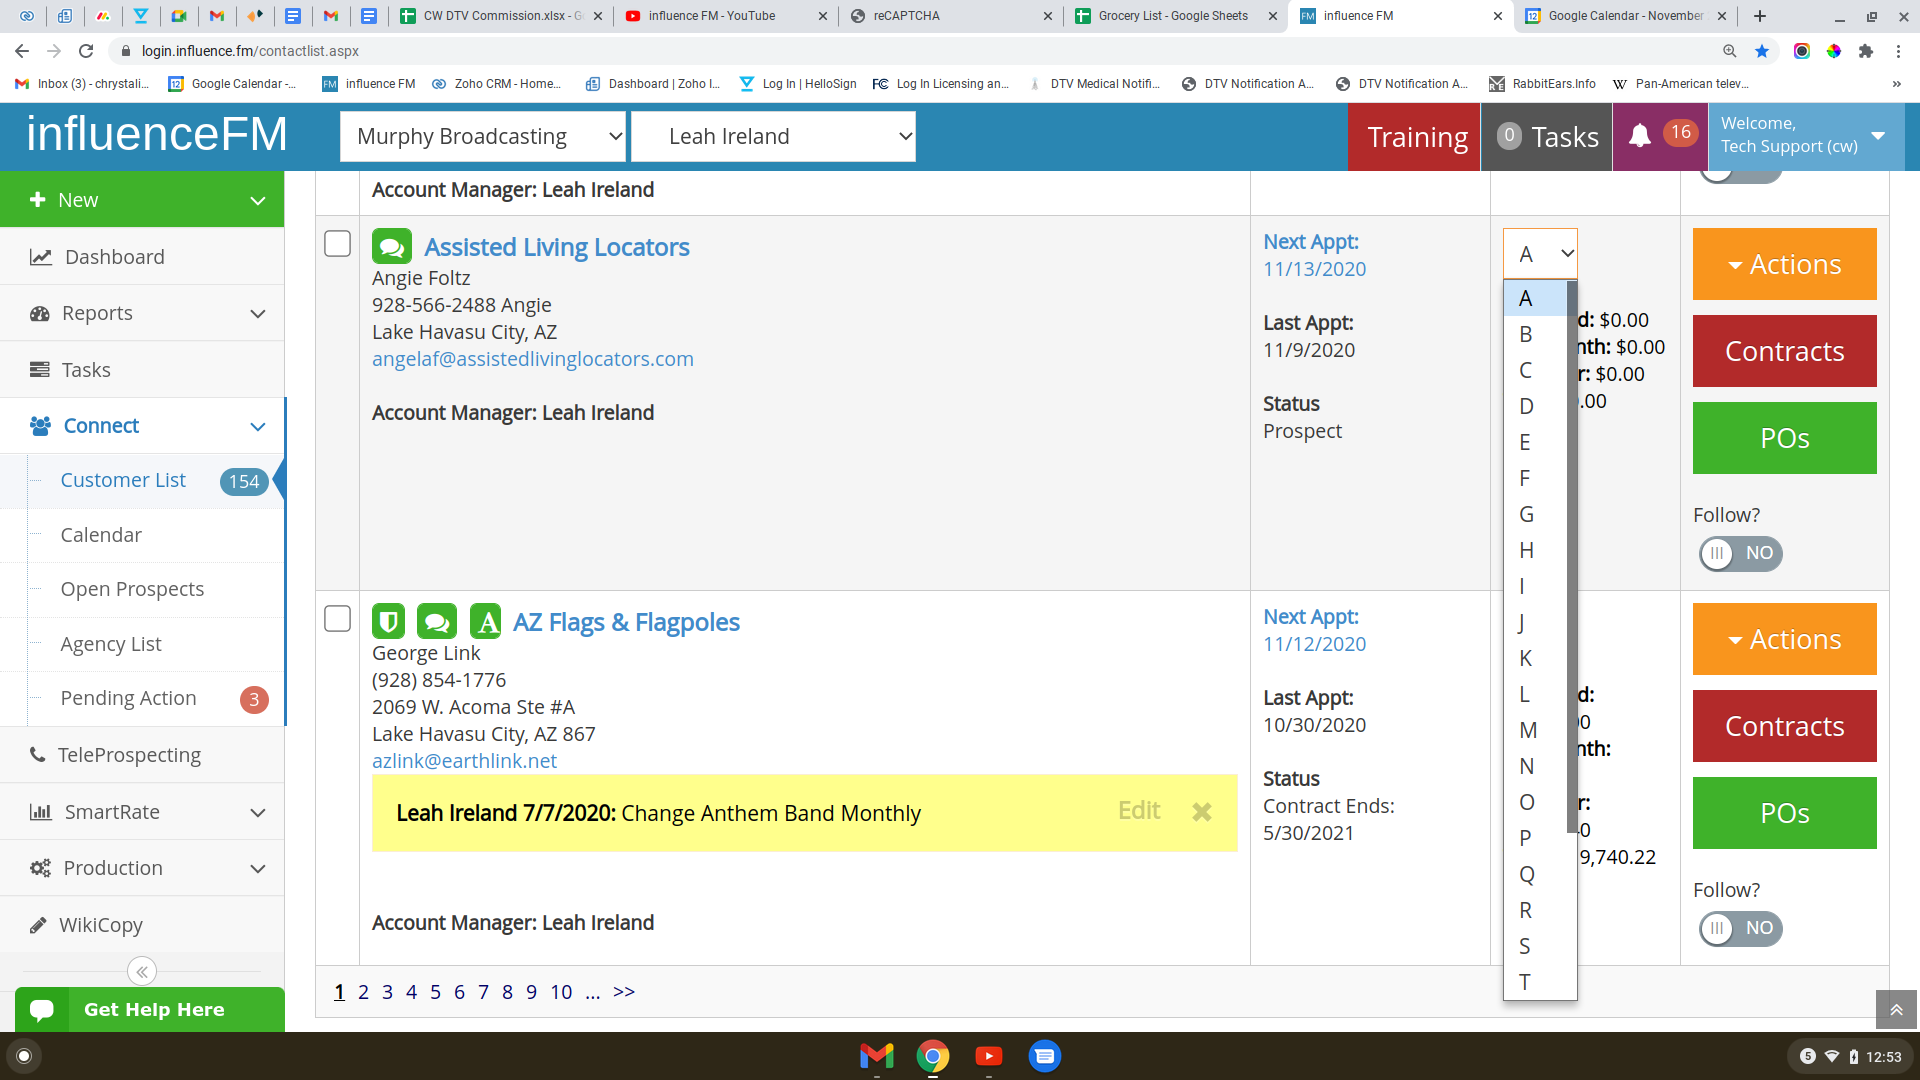
Rating System
Here you will be able to assign and categorize your customers by rating types. Example: P = Prospects, N = Non payment and so on. You are able to search through assigned types by clicking on the blue “Filter” button.
(see images below)
![]()
(watch an additional video tutorial below)
Customer List Icons Explained
![]() This speech bubble means that this customer has a CNA (customer needs analysis)
This speech bubble means that this customer has a CNA (customer needs analysis)
![]() This Shield symbol means that this customer is protected or made seasonal (Example: a festival or fair that happens once a year)
This Shield symbol means that this customer is protected or made seasonal (Example: a festival or fair that happens once a year)
![]() This “A” icon means that this listing is an Agency Account.
This “A” icon means that this listing is an Agency Account.
![]()
(watch an additional video tutorial below)
Removing unwanted customers from your list (click to open)
There are two ways to remove customers from your customer list:
Remove a single customer from your customer list:
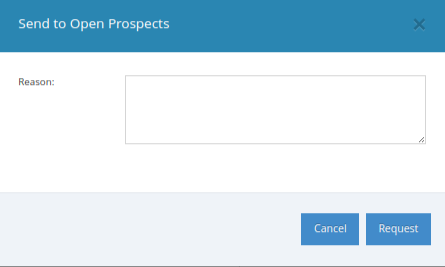
You can do this by clicking on the orange “Action“ button to the right of the customer and select “send to prospect list”.
To send customers to the prospect list one at a time (see example below)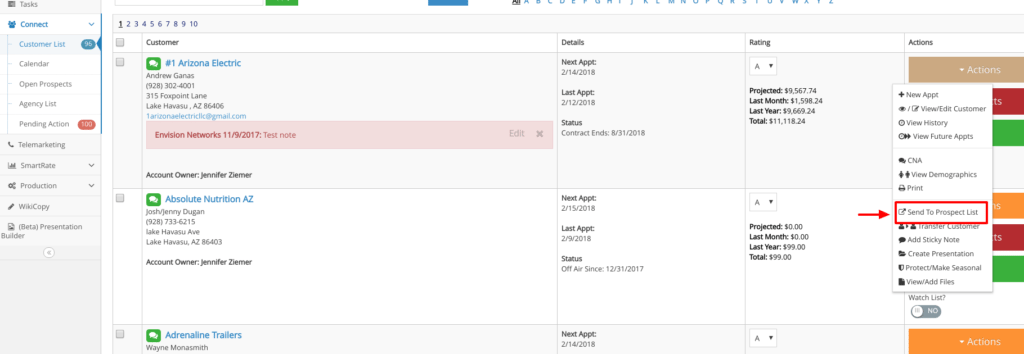

Remove multiple customers from your customer list:
- Scroll to the bottom of customer list and set “customers per page” to “All”.
- Then scroll back up to the top and select the “bulk actions” drop down menu to the left of the page and select “send to prospects list”.
- Either select all customers by checking off the top check box to the top left of the customer list or do them by only selecting the particular customers you would like to get off your customer list.
- Then click the green “Apply” button.
- The system will then ask you to put in a short description of why you want to get rid of those customers
- Finally, click the “request button”
To send customers to the prospect list in bulk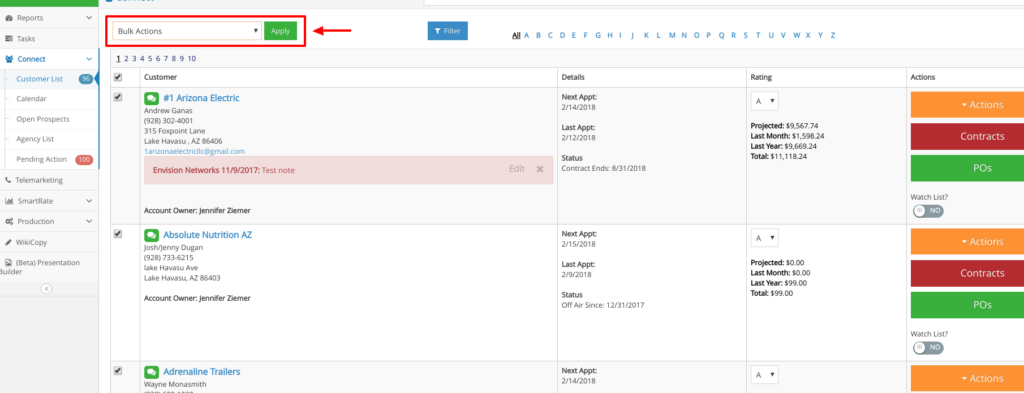

Filtering your customer list (click to open)
There are three different ways to filter your customer list
- Search at the top of the screen by business name or customers first and last name
- By alphabetical order – at the top of the screen you will see the alphabet
- By clicking on the blue filter button at the top middle of the customer list screen

Using the Filter Button:
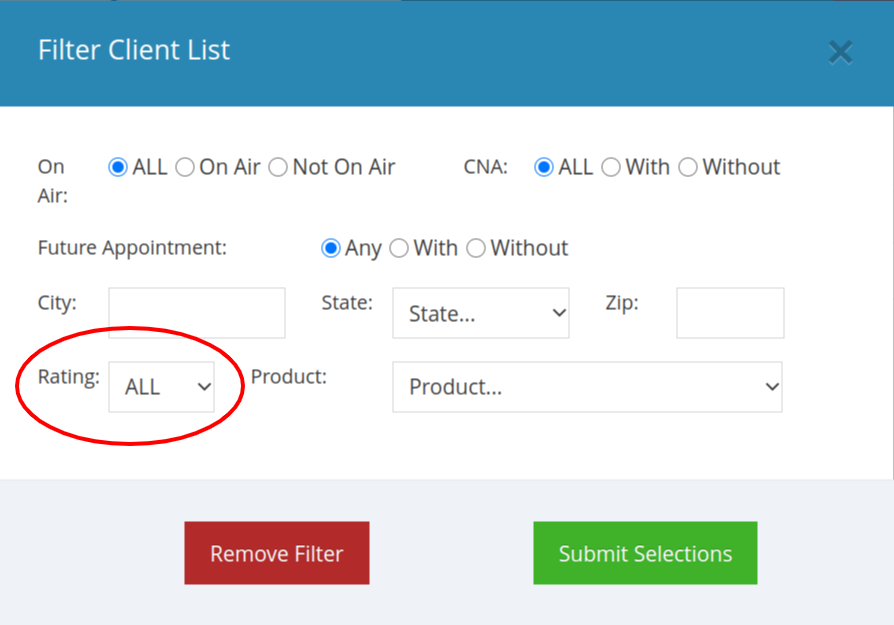
When clicking on the blue “Filter” button on the top middle of the customer list screen, a pop-up window will appear with the following options:
- If the client is on or off the air with you
- Whether or not a CNA has been done with that customer
- With or without a future appointment
- City, State and Zip Code
- Rating
- Product/Business category type – i.e. realtors, restaurants or auto mechanics
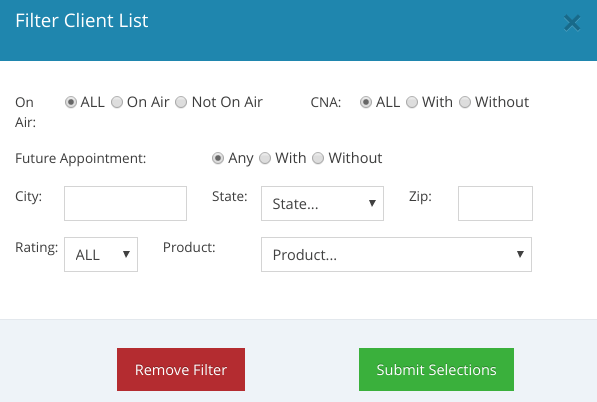
Be sure to click the green “Submit Selections” button once you get the filter set the way you like.
Please remember, once a filter is applied, it stays on until you turn it off. To remove the filter, click the filter button that will have replaced the blue filter button in the middle of the screen with a red button that says “filtered”.Once the window opens click the red button that says “Remove Filter”
Bulk Actions: how to manipulate and take action to multiple clients (click to open)
What Can I do with Bulk Actions?
This is located at the top left of the customer list screen.

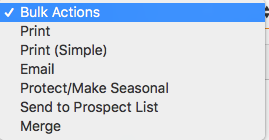
Print: Print customer list and details
Print (simple): Print only name of business, phone number and e-mail
Email: Email all customers or selected customers at once
Protect/Make Seasonal: Protect or Make multiple accounts seasonal (your manager will need to approve this action)
Send to Prospect List: This will send the selected customer to the Prospect List (your manager will need to approve this action)
Merge: This will allow you to merge a duplicate customer. The only time you will probably use this is when you do a search and notice a duplicate. This will need to be approved by your manager. Why? In some instances your company may have a reason for the duplicate.
In order to execute a bulk action you must click the green "Apply" button to the right of the bulk actions drop down menu.
Tips:
- Why does nothing happen when I go to print? This is because your pop-ups are being blocked. Look in the top right hand corner and select allow pop-ups from influence FM. You will only need to do this once.
- The client list only loads 10 clients at a time in alphabetical order. This is for loading speed purposes to make the system run faster. To load more clients on a screen, scroll to the bottom of the list and set customers per page to a higher increment.
Adding appointments to your calendar (click to open)
The first thing you will want to do as a new user to influence FM is add appointments to your calendar. Make sure you add ALL the customers on your customer list so you can get your pipeline rolling. This is the hardest and most tedious aspect of influence FM, but worth the effort!
TIP: If you don’t think you will see some of the customers on your list in the next year or so and they are essentially prospects, the best thing to do would be to send them to the open prospect list. This will give someone else a try at getting that client on the air. This is also good for your moral! You don’t want to have 200 clients on your list and maybe only half of those clients would have a future appointment. What we have found with users that have a large number of “customers” on their customer list and DON’T have a future appointment booked, it tends to make the sales rep feel overwhelmed. Reps think that their manager is looking down on them for not having future appointments for all of their customers. Do yourself a favor and get rid of customers that you know you will not see in the next year. This is psychological, your customers with out next appointments will have a bright red bold text that says, “Next Appt: None“. This will ease your mind when your manager looks at your list and can see that ALL of your customers are being taken care of and you’re not just “hording” accounts. (Removing customers from your customer list will be covered in the next section)
Appointments can be scheduled for your customers one of two ways:
- From your customer list (this is recommended when using influence FM for the first time) When you first start using the influence FM CRM, we recommend adding appointments directly from your customer list and not your calendar. This way you won’t miss any customers from receiving a future appointment.
- The second is from your calendar.
Below are directions for 2 different ways to add customer appointments to the influence FM’s calendar.
Adding an appointment from your customer list

Adding an appointment from your calendar
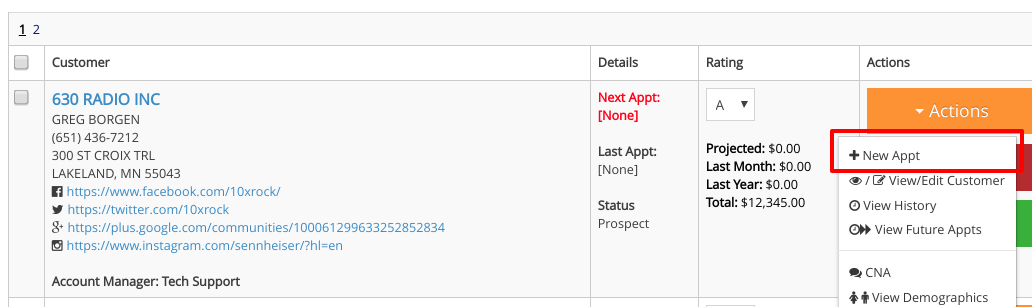
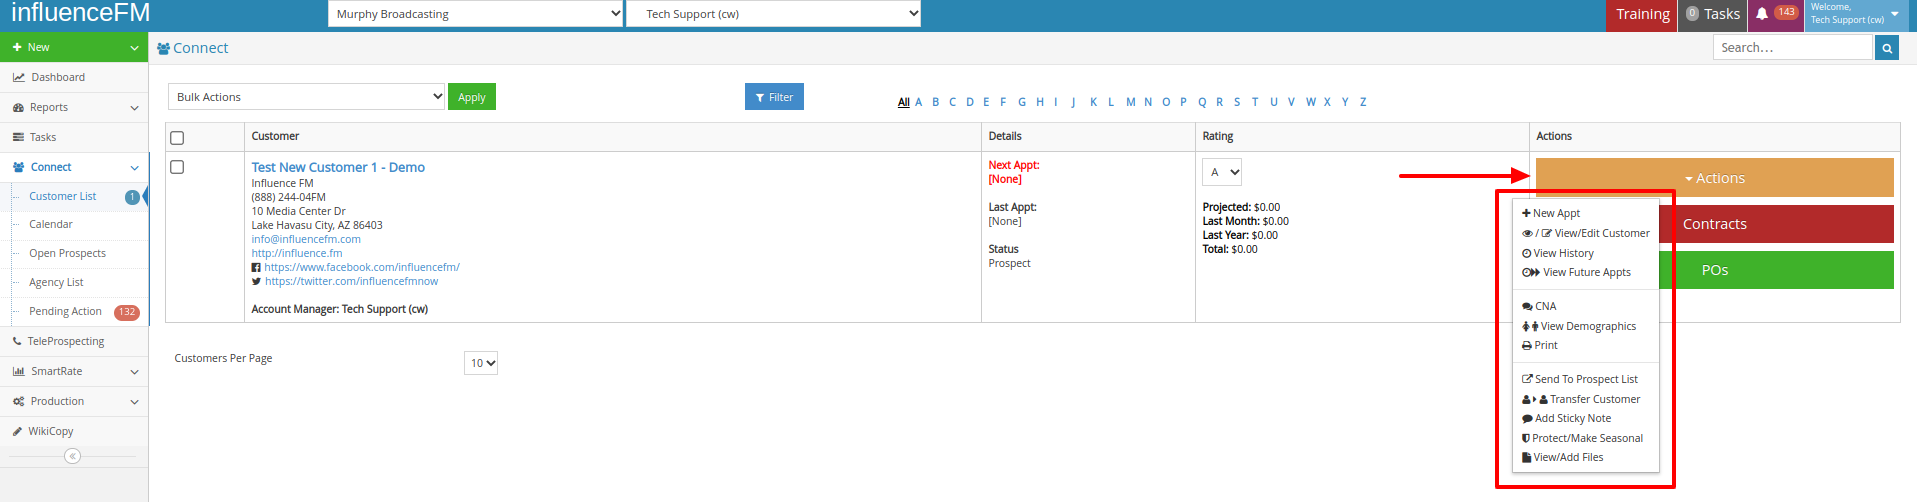
Connect: Customer List "Actions" button (click to open)
influenceFM "Actions" Button
Connect: Customer List
In the "Customer List" page under Connect, you have the following options by clicking on the orange "Actions" button on the right side of your screen: New Appt, View/Edit Customer, View History, View Future Appts, CNA, View Demographics, Print, Send To Prospect List, Transfer Customer, Add Sticky Note, Protect/Make Seasonal and View/Edit Files. Below you will see a brief description of each option along with a screenshot.
Customer List "Actions" Button details: (Orange Button - Top Right)

Once clicked, these are the options in the orange action button:
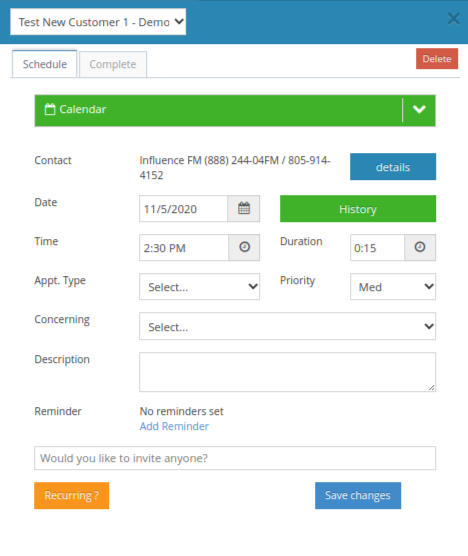
New Appt is where you can create a new appointment for this customer.
View/Edit customer is where you can edit details about the customer including Names, Phone Numbers, Addresses, etc..
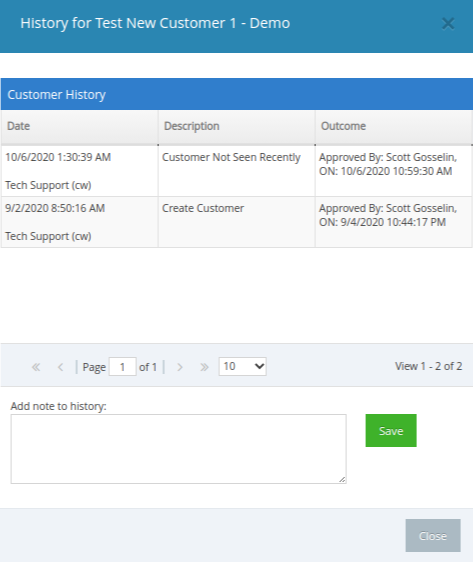
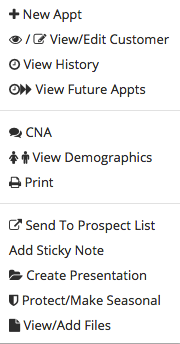 View History is where you can easily view all past appointments for the selected customer.
View Future Appointments is where you can view all future appointments for the selected customer. (This is a lot easier than combing through your calendar to view all upcoming appointments for a customer).
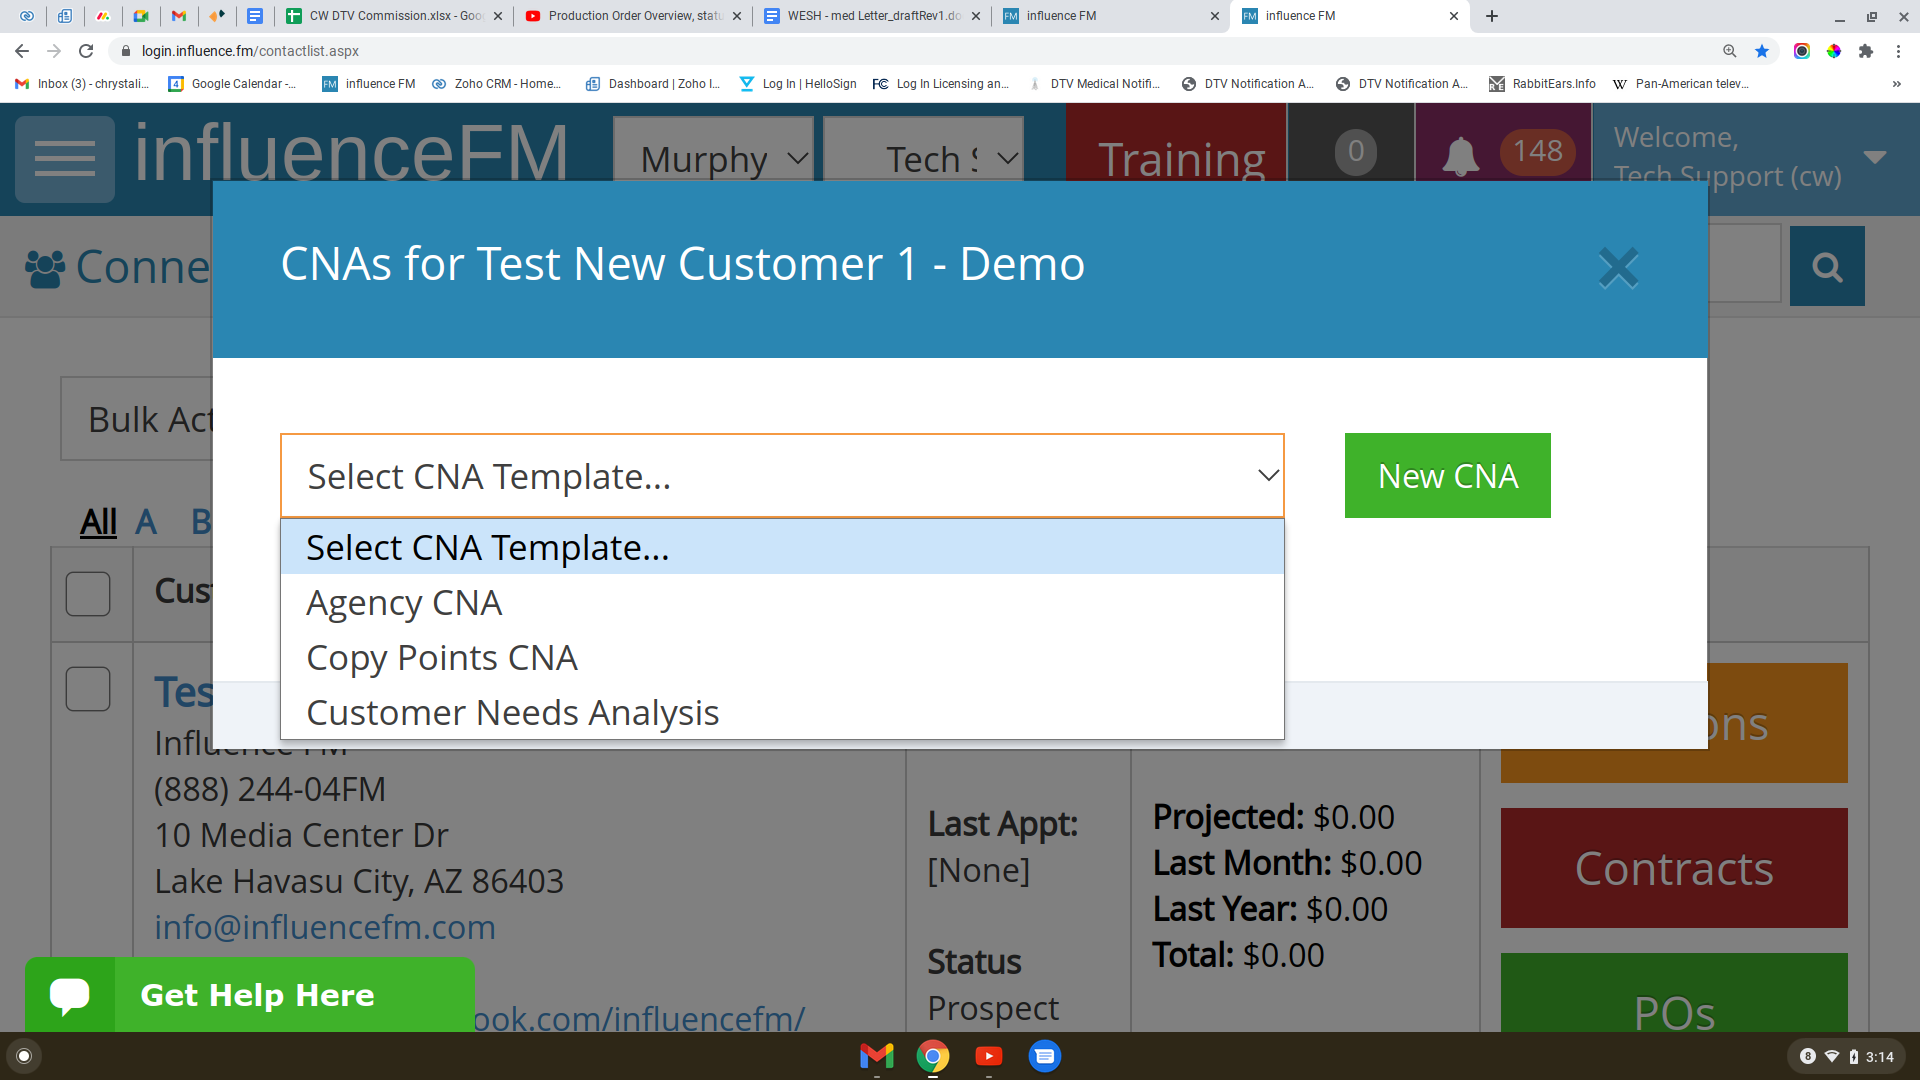
CNA is where you can view all of the past CNA's for the selected customer. (as long as your company has this feature enabled, ask your manager)
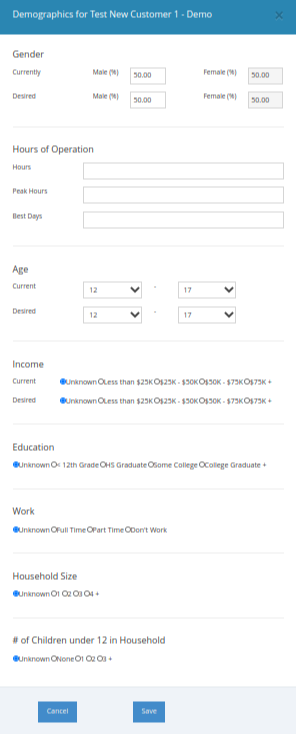
View Demographics allows you to edit what your selected customers clientele base is. This is all manually inputted and a lot of information can be gathered from your customer or a simple Google search.
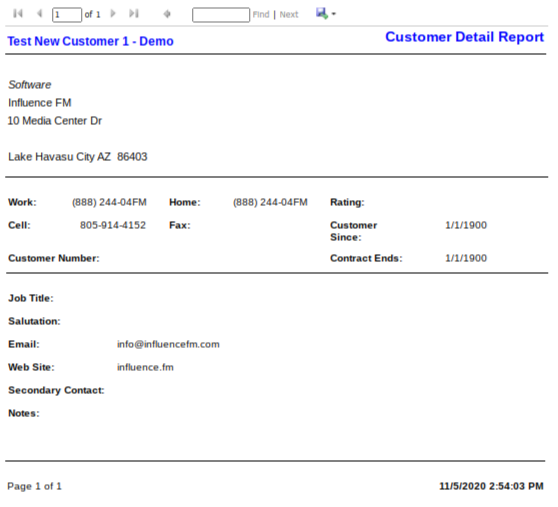
Print allows you to print your customer details. You can print your entire customer list as well. (we will go over this in the bulk actions section)
Send to Prospect List is for when you want to remove a client from your customer list.
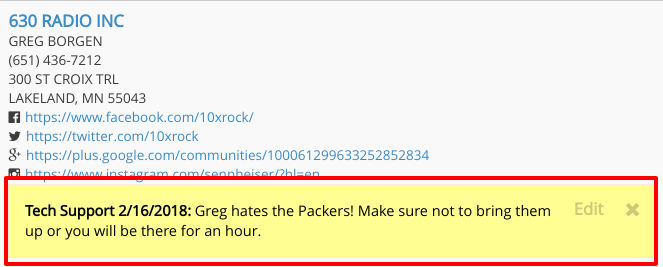
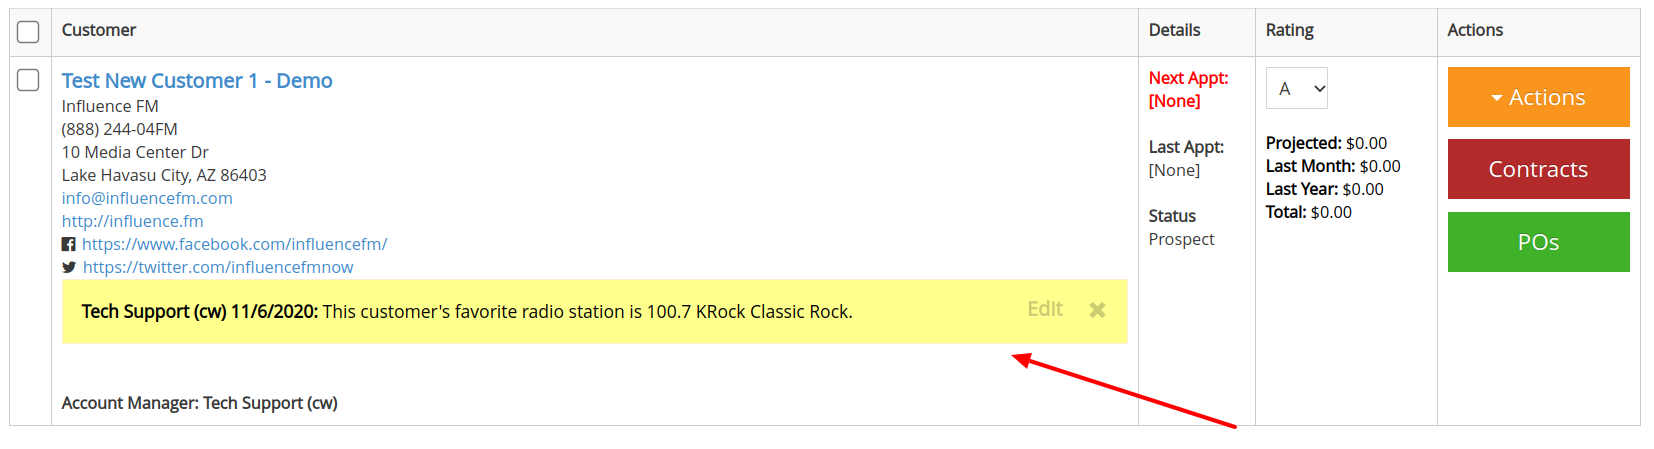
Add Sticky Note is a great feature for any information that you need to stick out about a client. It would be important information that you want to be reminded of every time you look at this client. When you add a sticky note, it shows up under the clients name and details. (Note: managers can add sticky notes to clients) If a manager does add a sticky note to your client, the sticky note will show up in red and an email will also get sent to you.
Sticky note pictured below.
Protect/Make Seasonal is intended for customers that do NOT need to be seen on a regular basis. Examples: a local jet ski rental business that is only open part of the year or the county fair that comes around once a year. (Your manager will need to approve these before this is allowed)
View/Add Files allows the influence FM system to upload any and as many files as you want for a customer. An example would be a signed document, audio file or logo. If you do not see this option after you have clicked this, it means your company has not yet connected a Google Drive or Drop Box account to influence FM.
New Appt: Here you can add a new appointment from your customer list that goes directly into your calendar
View/Edit Customer: this is where you will be able to view or edit your customer information and add additional contacts

View History: view the entire history of this customer. Nothing ever gets deleted.
View Future Appts: You will be able to see any future appointments that are scheduled for this customer
CNA: Complete your customer needs analysis form from here
View Demographics: complete demographics relating to this customer so you get a better understanding of that area
Print: print out your customer information
Send To Prospect List: send your customer to the prospect list if you feel you will not be able to sell to this customer
Transfer Customer: Here you will be able to transfer this customer to another team member
![]()
Add Sticky Note: You can add a sticky note to anyone in your customer list that you want special information to stand out for that customer.
(view the brief video tutorial below)
Protect/Make Seasonal: This is for those special customers that would be a seasonal business like jet ski rentals in the summer, the fair or a festival that happens once a year.
View/Add Files: Here you can view or add any files necessary for this customer.
(watch an additional video tutorial below)
the green "Actions" button has since been changed to orange