influenceFM “Actions” Button Overview
Textual content is below the video.
influenceFM “Actions” Button
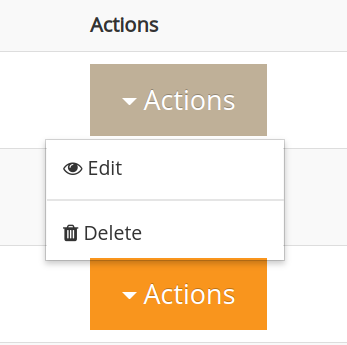
Below will explain what the orange “Actions” button will do in Connect, SmartRate, Production and WikiCopy.
The Action button is how you manipulate any one element in the software. Think of it as your “go to” button for any action you want to take.
Connect “Actions” Button: under the “Connect” menu, you will find the orange “Actions” button in the Customer List, Open Prospects, Agency List and Pending Actions
SmartRate “Actions” Button: under the “SmartRate” menu, you will find the orange “Actions” button in Contracts and Pending Contracts
Production “Actions” Button: under the “Production” menu, you will find the orange “Actions” button in Production Orders and Traffic Orders
WikiCopy “Actions” Button: in “WikiCopy”, you will also find the orange “Actions” button
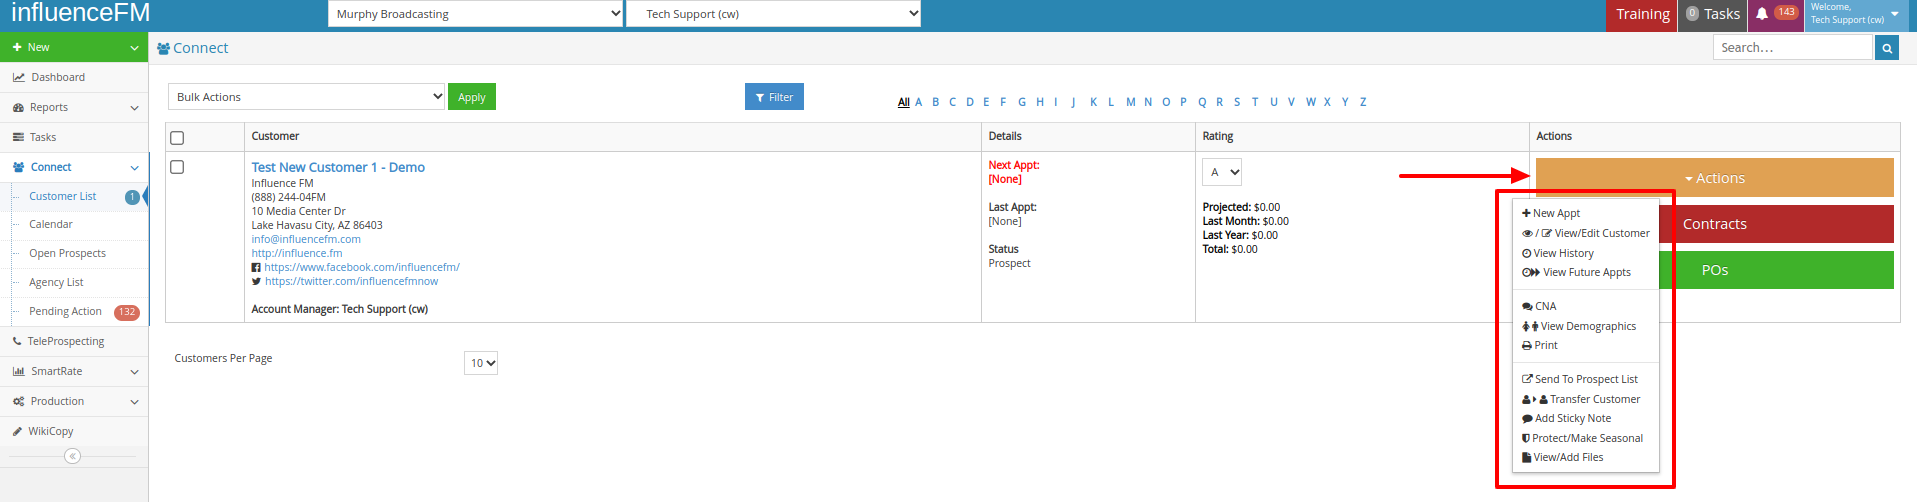
Connect: Customer List "Actions" button (click to open)
influenceFM “Actions” Button
Connect: Customer List
In the “Customer List” page under Connect, you have the following options by clicking on the orange “Actions” button on the right side of your screen: New Appt, View/Edit Customer, View History, View Future Appts, CNA, View Demographics, Print, Send To Prospect List, Transfer Customer, Add Sticky Note, Protect/Make Seasonal and View/Edit Files. Below you will see a brief description of each option along with a screenshot.
Customer List “Actions” Button details: (Orange Button – Top Right)

Once clicked, these are the options in the orange action button:
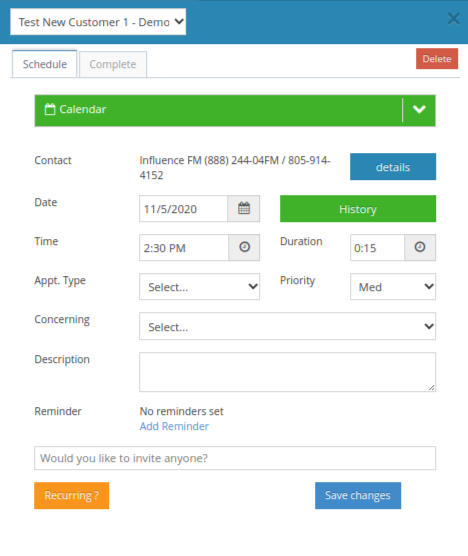
New Appt is where you can create a new appointment for this customer.
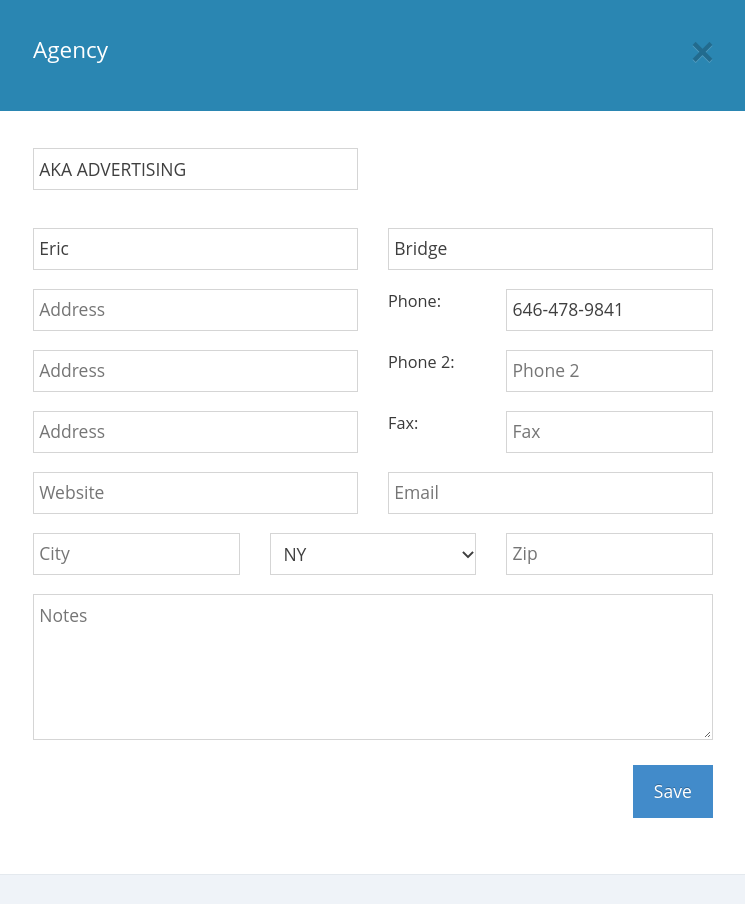
View/Edit customer is where you can edit details about the customer including Names, Phone Numbers, Addresses, etc..
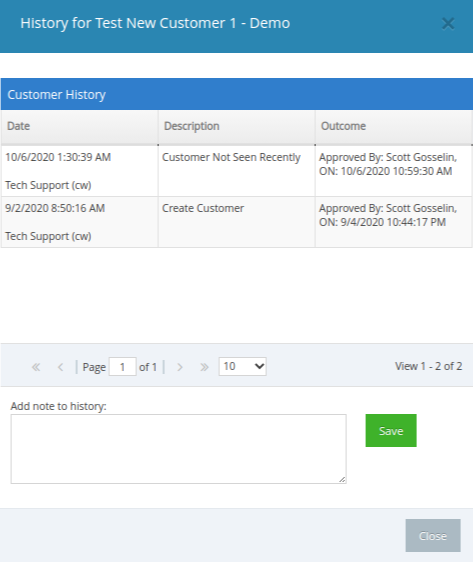
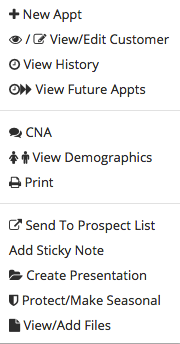 View History is where you can easily view all past appointments for the selected customer.
View Future Appointments is where you can view all future appointments for the selected customer. (This is a lot easier than combing through your calendar to view all upcoming appointments for a customer).
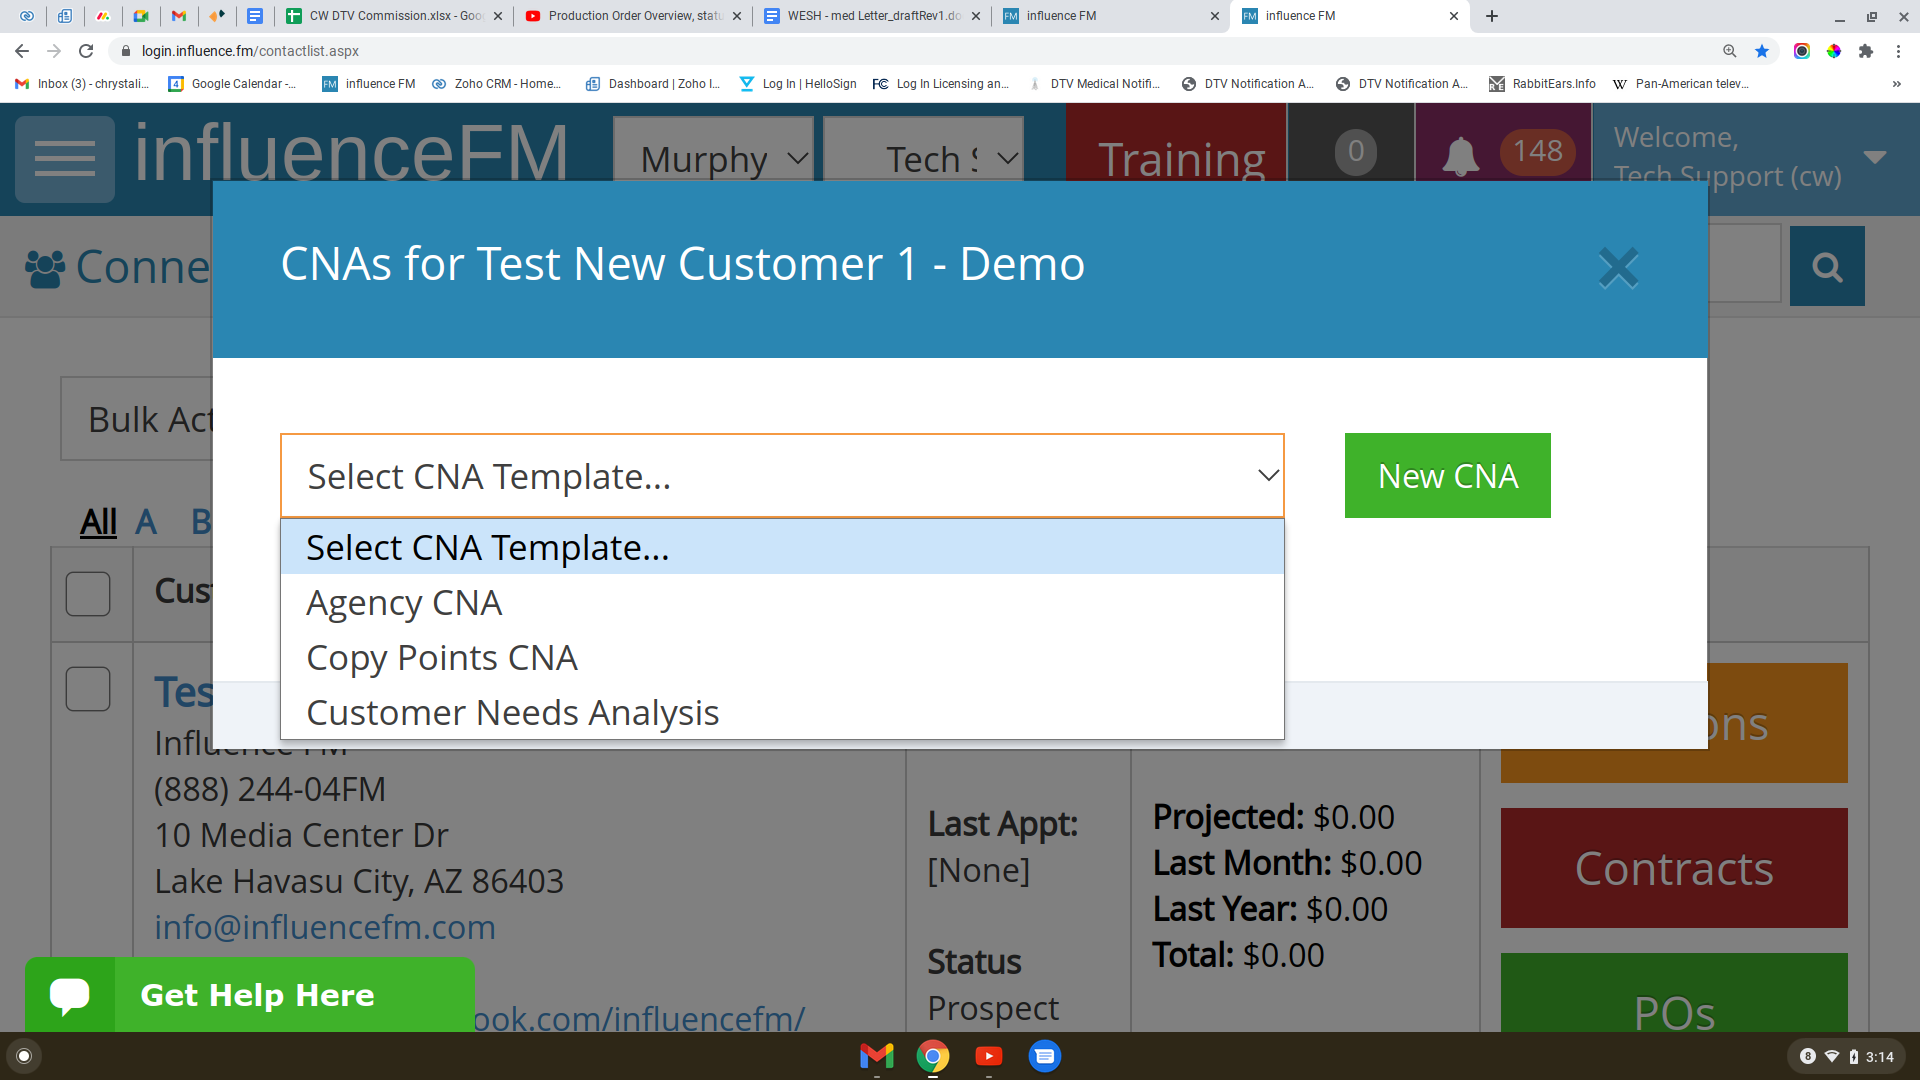
CNA is where you can view all of the past CNA’s for the selected customer. (as long as your company has this feature enabled, ask your manager)
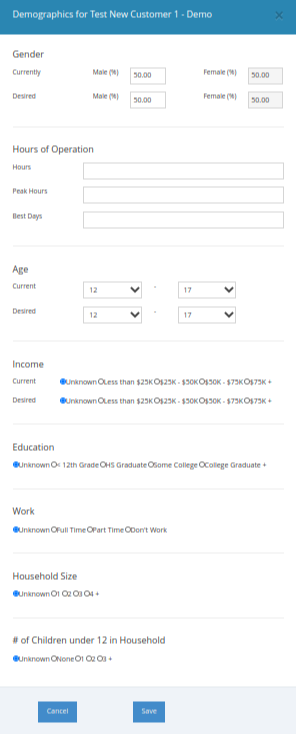
View Demographics allows you to edit what your selected customers clientele base is. This is all manually inputted and a lot of information can be gathered from your customer or a simple Google search.
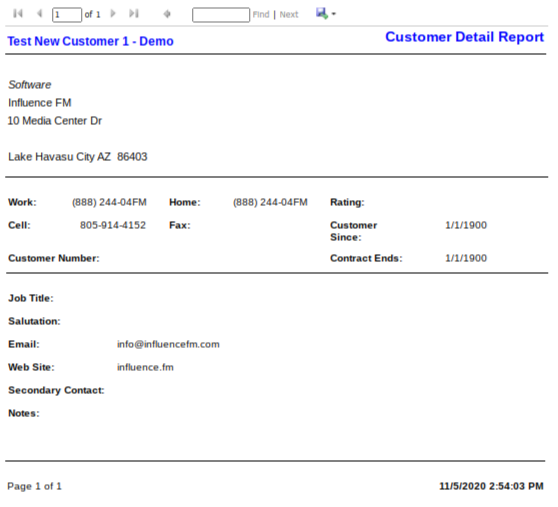
Print allows you to print your customer details. You can print your entire customer list as well. (we will go over this in the bulk actions section)
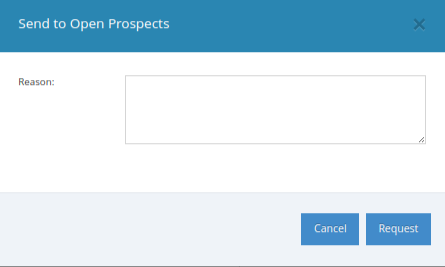
Send to Prospect List is for when you want to remove a client from your customer list.
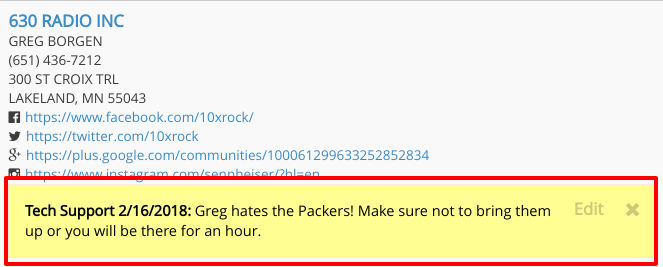
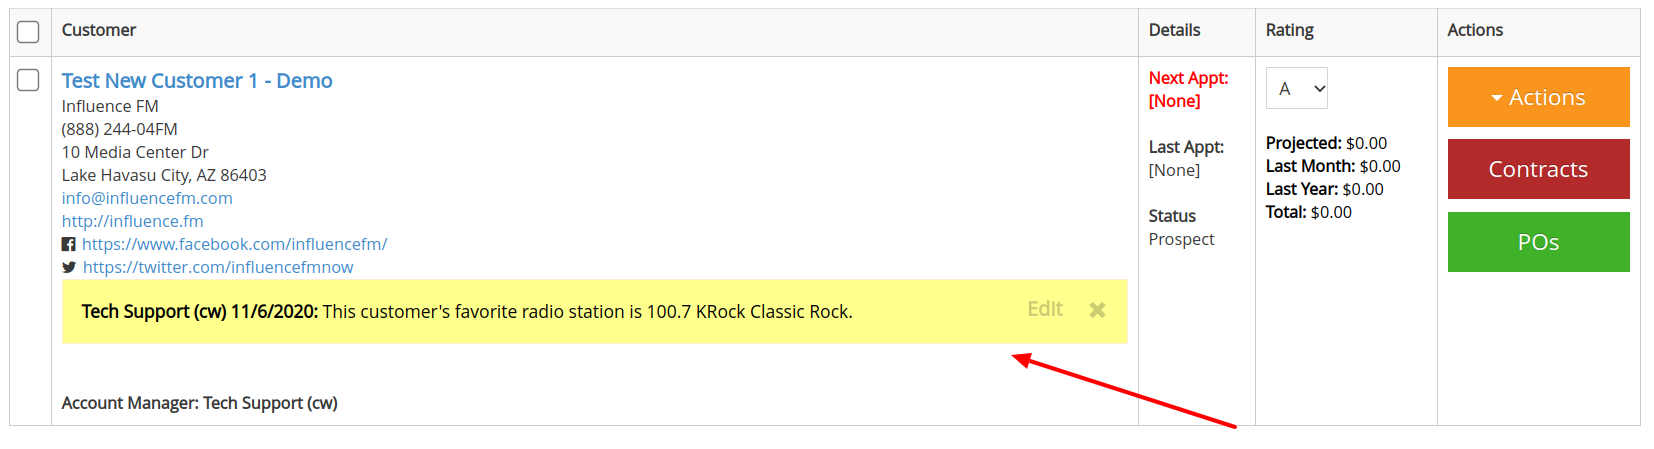
Add Sticky Note is a great feature for any information that you need to stick out about a client. It would be important information that you want to be reminded of every time you look at this client. When you add a sticky note, it shows up under the clients name and details. (Note: managers can add sticky notes to clients) If a manager does add a sticky note to your client, the sticky note will show up in red and an email will also get sent to you.
Sticky note pictured below.
Protect/Make Seasonal is intended for customers that do NOT need to be seen on a regular basis. Examples: a local jet ski rental business that is only open part of the year or the county fair that comes around once a year. (Your manager will need to approve these before this is allowed)
View/Add Files allows the influence FM system to upload any and as many files as you want for a customer. An example would be a signed document, audio file or logo. If you do not see this option after you have clicked this, it means your company has not yet connected a Google Drive or Drop Box account to influence FM.
New Appt: Here you can add a new appointment from your customer list that goes directly into your calendar
View/Edit Customer: this is where you will be able to view or edit your customer information and add additional contacts

View History: view the entire history of this customer. Nothing ever gets deleted.
View Future Appts: You will be able to see any future appointments that are scheduled for this customer
CNA: Complete your customer needs analysis form from here
View Demographics: complete demographics relating to this customer so you get a better understanding of that area
Print: print out your customer information
Send To Prospect List: send your customer to the prospect list if you feel you will not be able to sell to this customer
Transfer Customer: Here you will be able to transfer this customer to another team member
![]()
Add Sticky Note: You can add a sticky note to anyone in your customer list that you want special information to stand out for that customer.
(view the brief video tutorial below)
Protect/Make Seasonal: This is for those special customers that would be a seasonal business like jet ski rentals in the summer, the fair or a festival that happens once a year.
View/Add Files: Here you can view or add any files necessary for this customer.
(watch an additional video tutorial below)
Connect: Open Prospects "Actions" button (click to open)
influenceFM “Actions” Button
Connect: Open Prospects
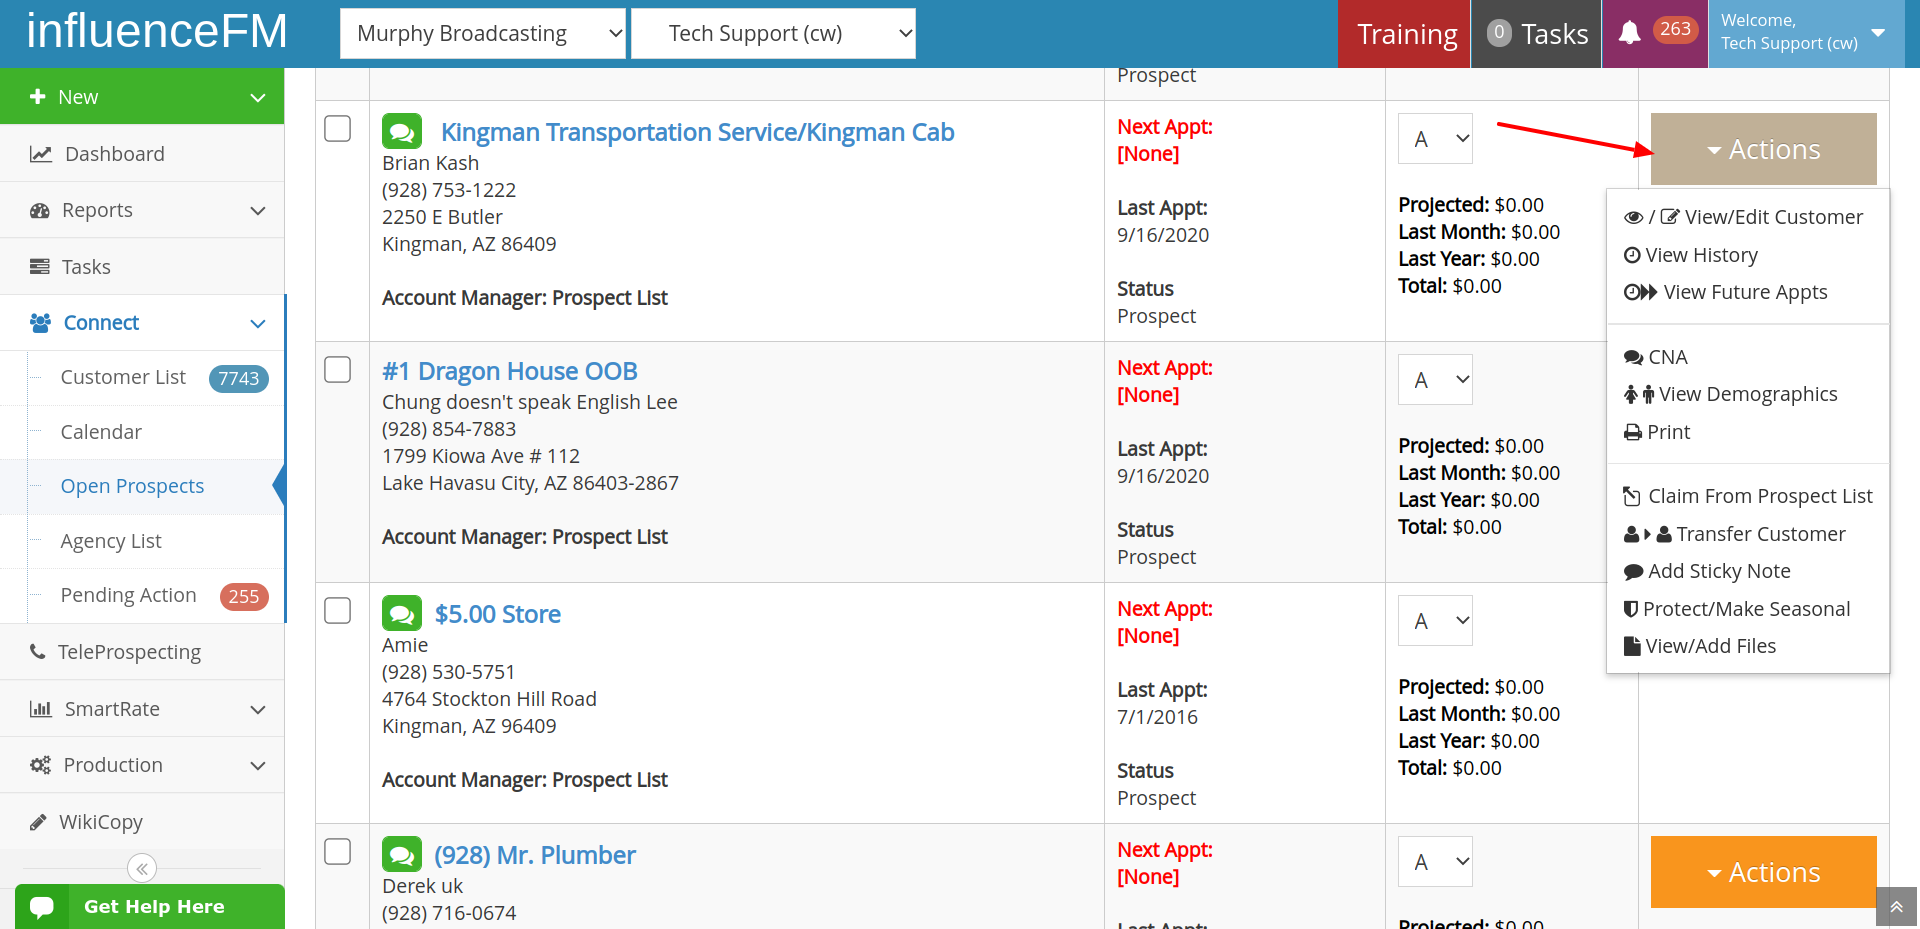
Click on the orange “Actions” button and there you will find the following actions to choose from: View/Edit Customer, View History, View Future Appts, CNA, View Demographics, Print, Claim From Prospect List, Transfer Customer, Add Sticky Note, Protect/Make Seasonal and View/Edit Files. Below you will see a brief description of each option along with a screenshot.
(see image below)
View/Edit Customer: this is where you will be able to view or edit your customer information and add additional contacts
View History: view the entire history of this customer. Nothing ever gets deleted.
View Future Appts: You will be able to see any future appointments that are scheduled for this customer
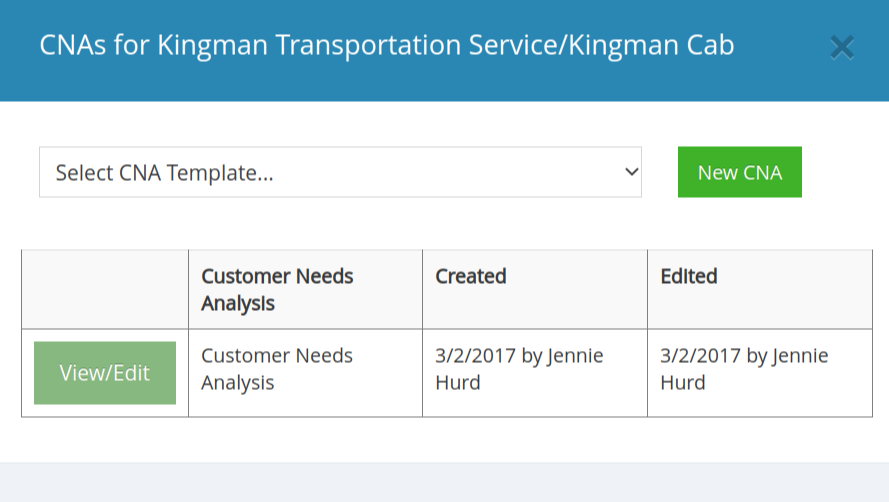
CNA: You will be able to view or edit a CNA for this customer or Complete your customer needs analysis form from here
View Demographics: complete demographics relating to this customer so you get a better understanding of that area
Print: Here you will be able to print out the entire prospect list or specific prospects that you are interested in.
Claim From Prospect List: Here you will be able to claim this prospect to add to your customer list. The manager will be get an email where they will be able to approve or reject that request.
Transfer Customer: Here you will be able to transfer this customer to another team member (with managers approval)
![]()
Add Sticky Note: You can add a sticky to anyone in your customer list that you want special information on that customer to stand out.
Protect/Make Seasonal: This is for those special customers that would be a seasonal business like jet ski rentals in the summer, the fair or a festival that happens once a year.
View/Add Files: Here you can view or add files for this prospect.
(see additional video tutorials below)
Connect: Agency List "Actions" button (click to open)
influenceFM “Actions” Button
Connect: Agency List
Here you will be able to Edit or Delete customers on your agency list.
Connect: Pending Action "Actions" button (click to open)
influenceFM “Actions” Button
Connect: Pending Action
Connect: Pending Action is where the manager will see the status of each customer. For Example: if the customer hasnt been seen in a required number of days or deleting an appointment on the calendar or a sales rep sending a customer to the prospect list.
Click on the orange “Actions” button and there you will find the following actions to choose from: Approve, Reject, Send To Prospect List, Transfer Customer, View History or View Future Appointments (see image below)
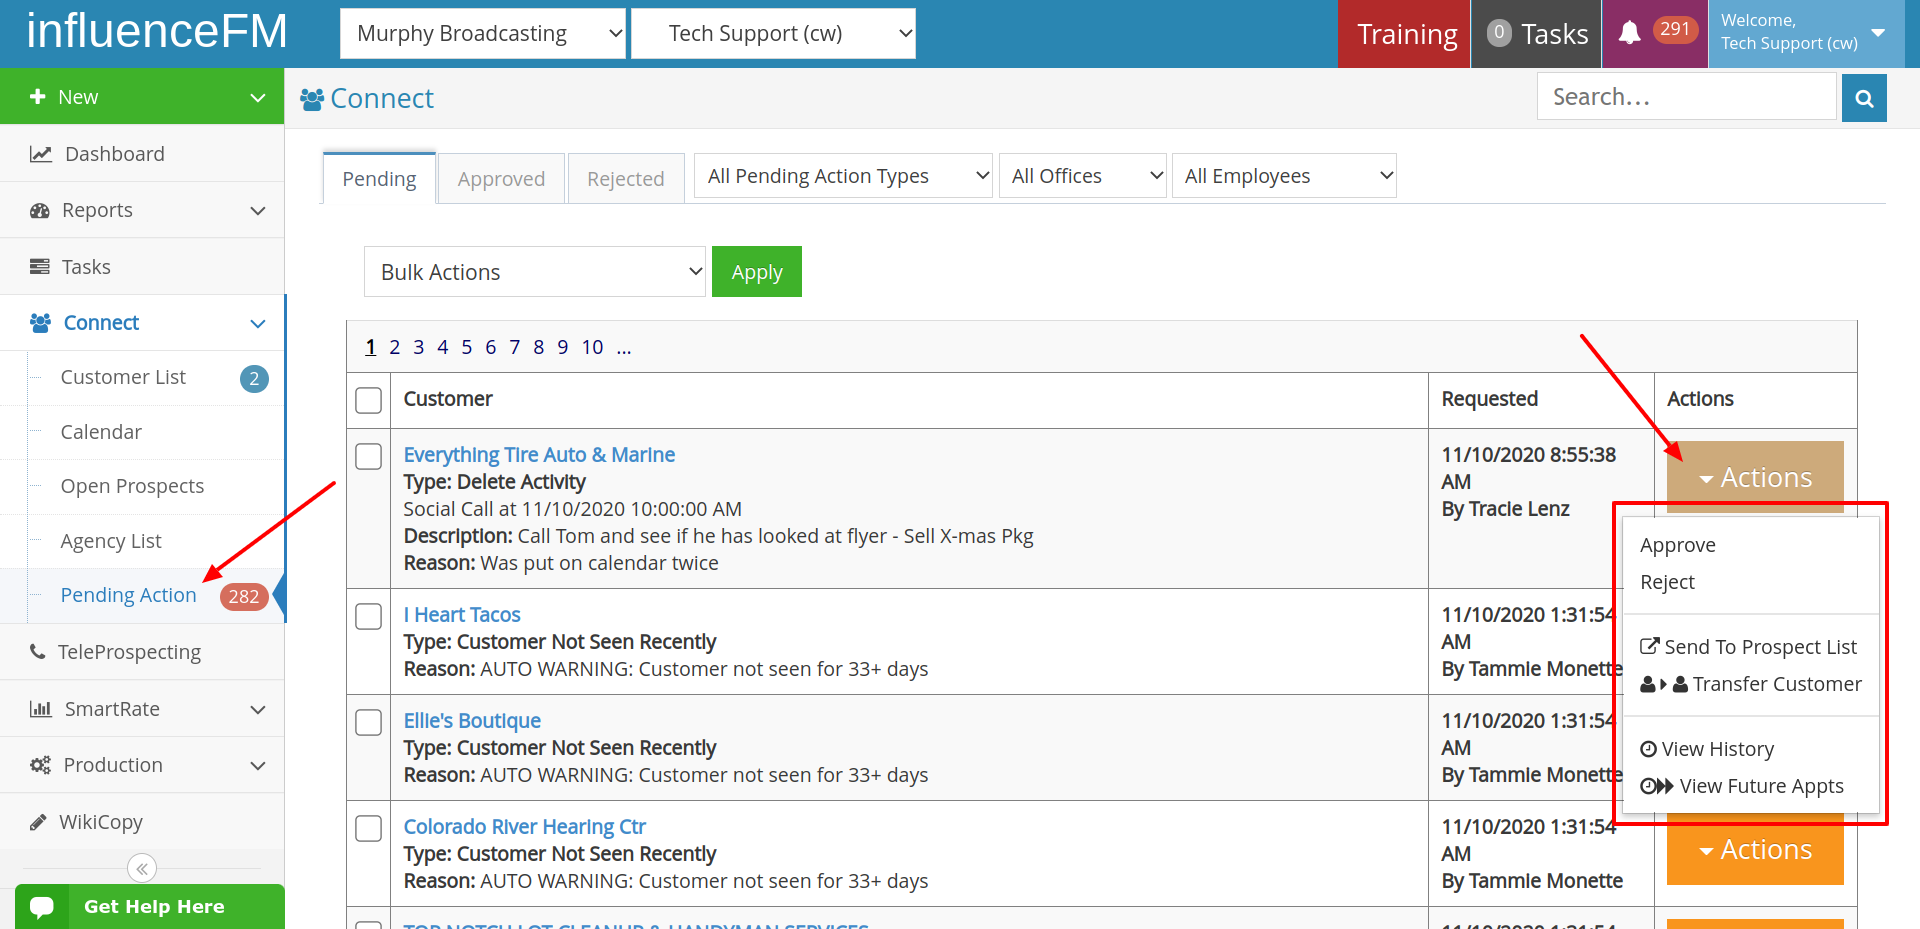
Approve: Here is where the manager will approve the sales rep’s request
Reject: Here is where the manager rejects a request from a sales rep
Send To Prospect List: The manager can decide to send a customer to the prospect list to give other sales reps a chance to connect with that customer
Transfer Customer: The manager is able to transfer a customer directly to another sales rep
View History: There is where the entire history of the customer and everything that has gone on with that customer is able to be viewed
View Future Appointments: Here is where you will be able to see any future appointments for that customer
SmartRate: Contracts "Actions" button (click to open)
influenceFM “Actions”
SmartRate: By clicking on Contracts under the SmartRate menu is where you will be able to utilize many features by clicking on the orange “Actions” button.
Click on the orange “Actions” button and there you will find the following actions to choose from to: View/Edit Contract, View Customer History, Print by Weekly, Monthly or Summary, E-Sign Contract, Send to Archive or Trash, Duplicate a Contact or View/Add Files. (see image below)
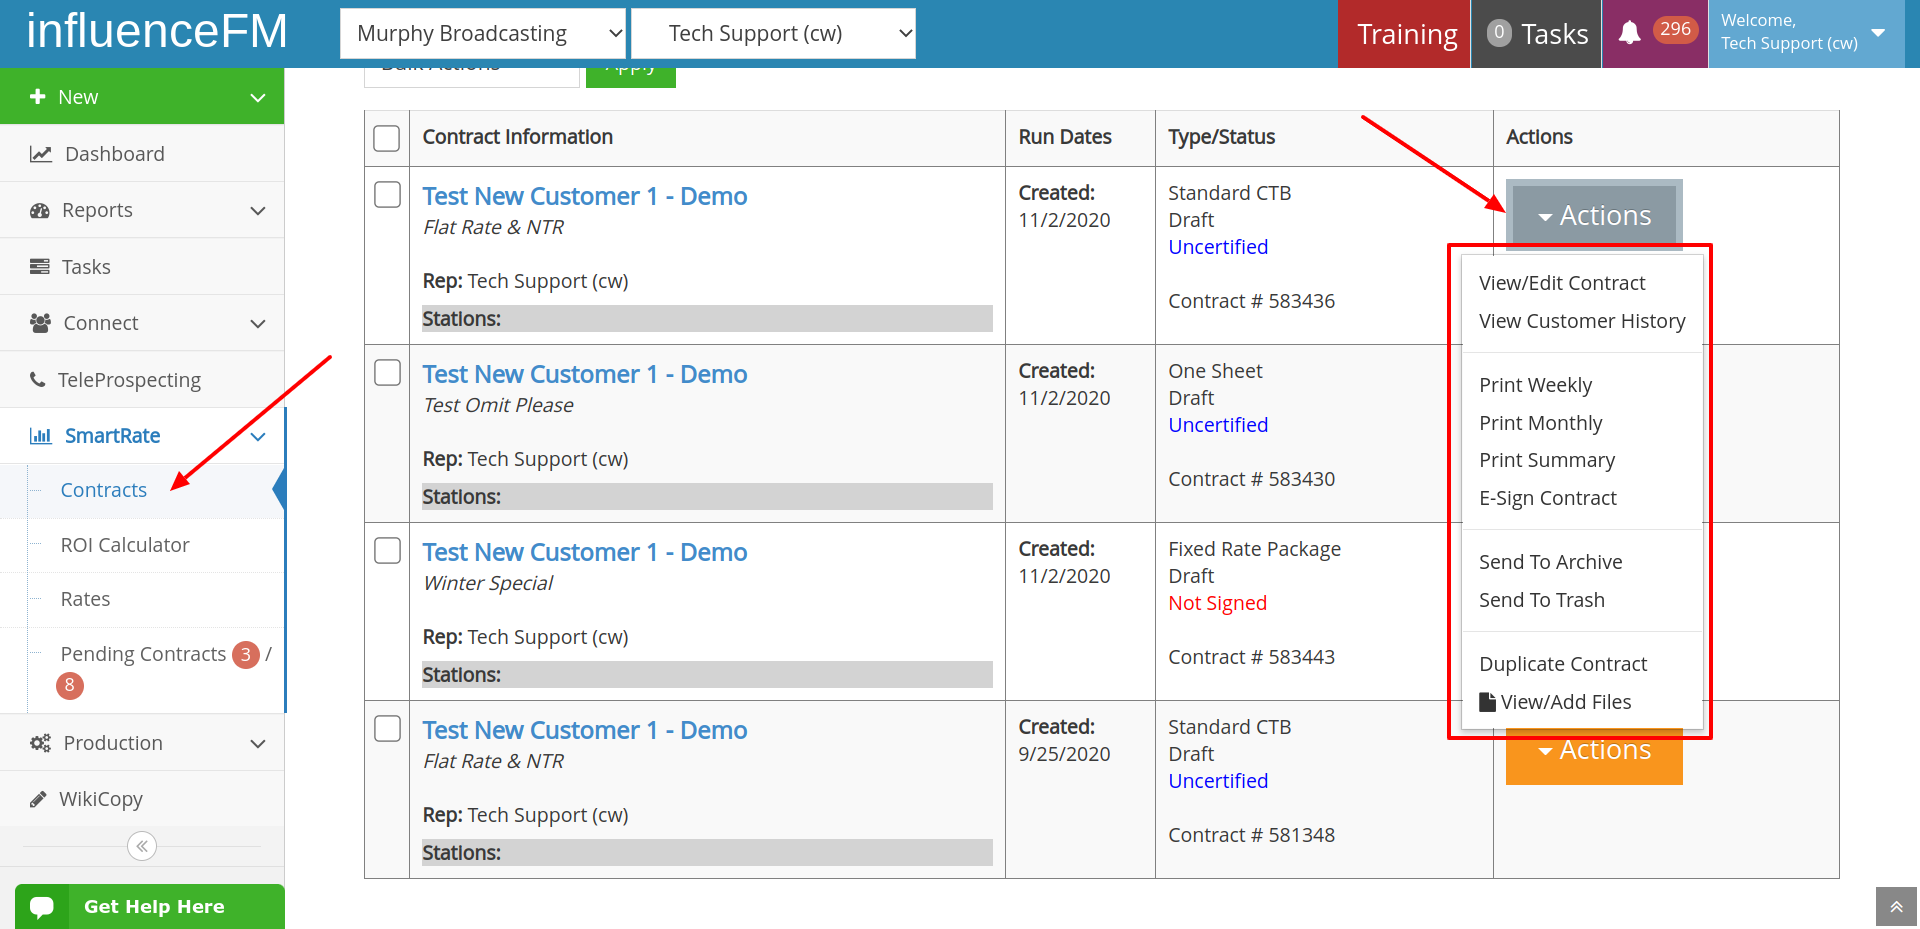
View/Edit Contract: Choose the contract you would like to be able to view or edit
View Customer History: View the history for this customer
Print by Weekly, Monthly or Summary: print the contract
E-Sign Contract: send this contract to the customer for an e-signature
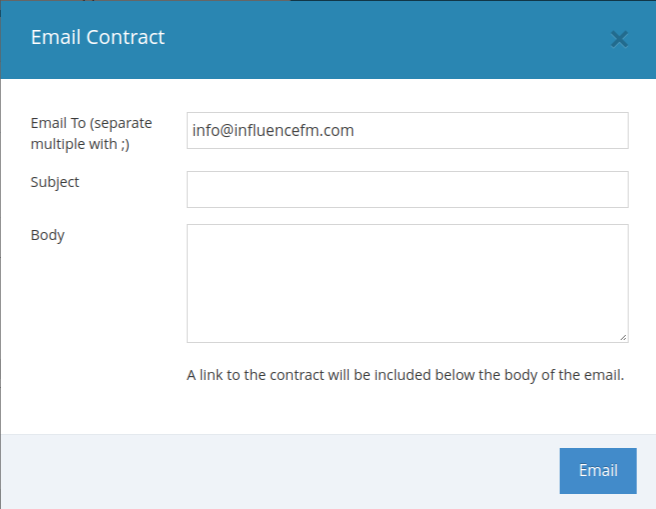
Send to Archive or Trash: send this contract to archive to use at a later date or trash if you won’t be using this contact any time in the future
Duplicate a Contract: duplicate a difficult contract to use again in the future or to use for other customers
View/Add Files: You will be able to view and add files to this contract or add to all files for this customer
SmartRate: Pending Contracts "Actions" button (click to open)
influenceFM “Actions” Button
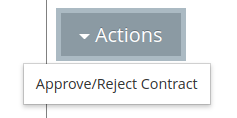
SmartRate: By clicking on Pending Contracts under the SmartRate menu is where you will be able to utilize features by clicking on the orange “Actions” button.
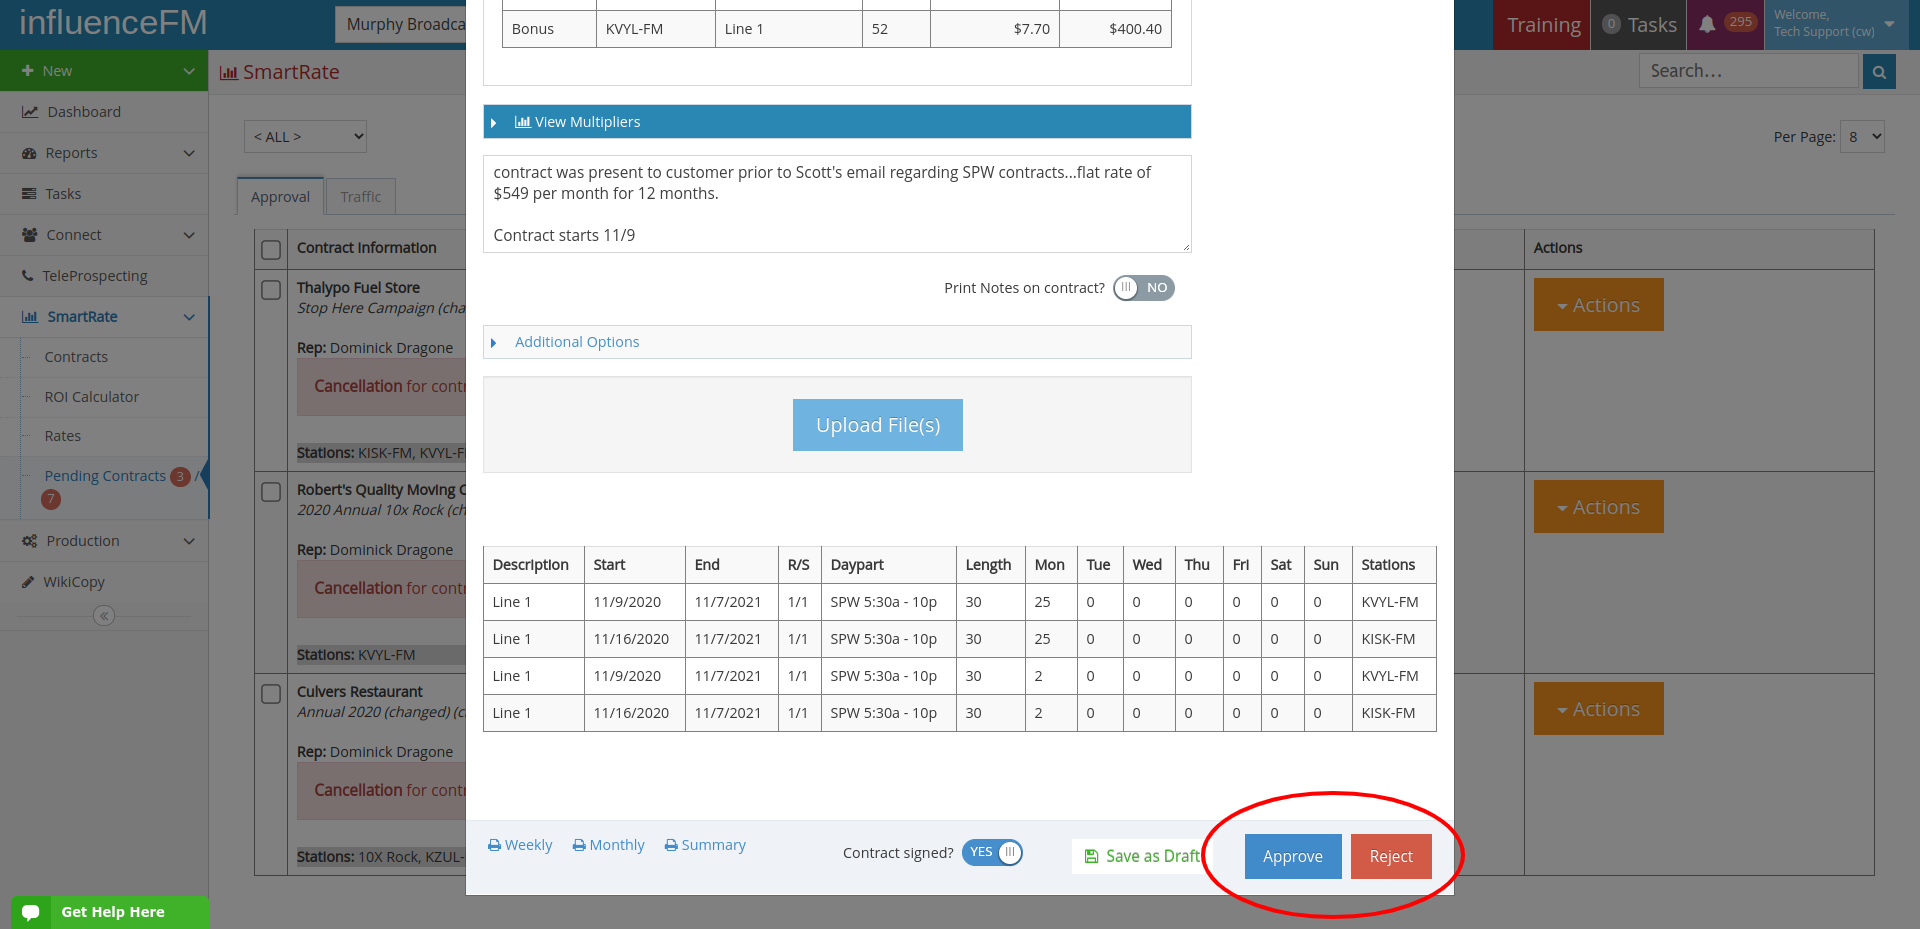
Click on the orange “Actions” button to be able to open the contract and Approve or Reject it. (see image below)
Production: Production Orders "Actions" button (click to open)
influenceFM “Actions”
Production Orders “Actions” Button: under the “Production” menu, you will find the orange “Actions” button with the following available options to choose from: View/Edit PO, Send to Storage, Duplicate, Print, Email, View History, View/Add Files and !Report a Problem.
The large orange “Actions” button is located to the right of a customer
(see image below)
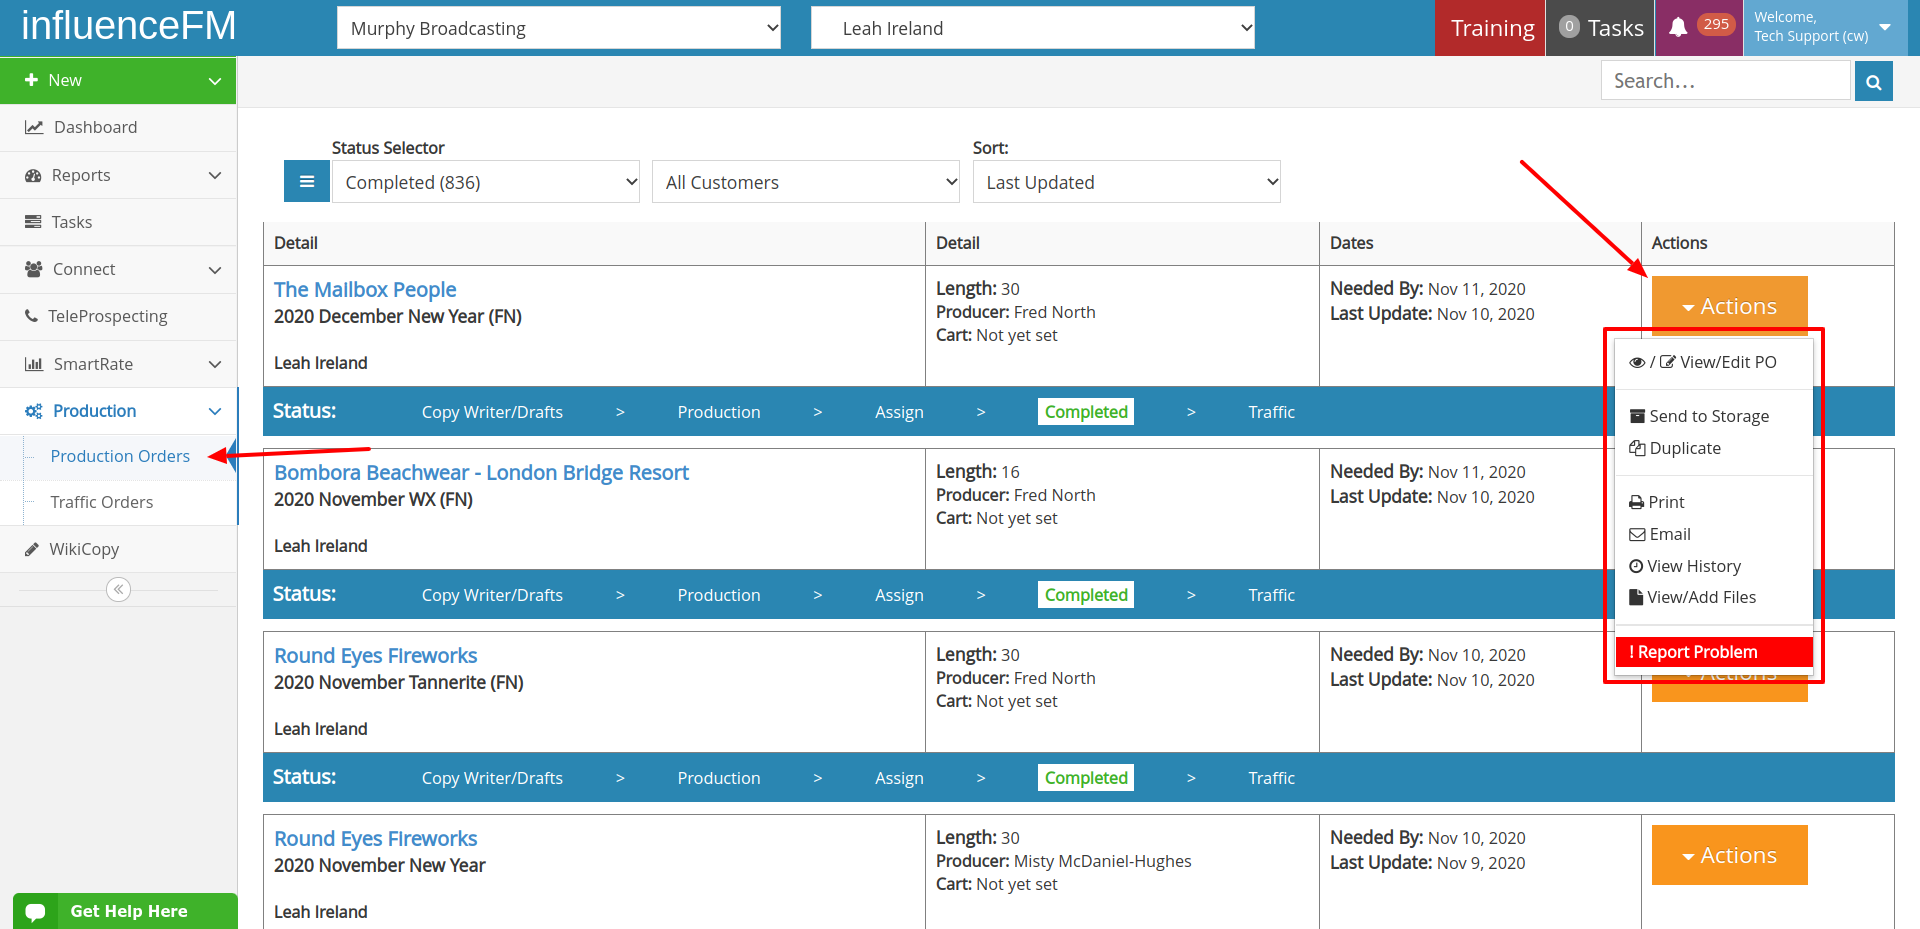
View/Edit PO – Here you can edit every detail of your PO and make changes if necessary.
If you have already submitted the PO, you MUST use the “!Report a Problem” so everyone working on the order knows there is a change that is needed.
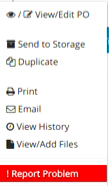 Send to Storage – Here you can send PO’s to storage so you don’t lose old production orders (you may want to use this to store PO’s for a customer with many PO’s)
Duplicate – This is an easy way to recreate a PO (this is helpful when you are on a busy schedule and need to make a similar PO from one you have done in the past) Also, if you need to make changes to an old PO, before deleting it, click the action button and select “duplicate” then make the changes on the new version.
Print – The print option allows you to have a physical copy of the details of your PO
Email – Here you can email your PO to your manager or anyone in the company
View History – This is a quick way to view past PO’s for this customer
View/Add Files – Use this if you need to quickly add any files to your PO to make the process run more smoothly
!Report Problem: If you have already submitted a PO, use this if you want to make a change to the PO. If any changes need to be made, you must click on report a problem so everyone involved with the process knows that there is a change to this production order. At this stage, if you use the View/Edit PO option for the already submitted PO, other people working on that PO wont be able to see the changes that you made.
(watch an additional video tutorial below)
Production: Traffic Orders "Actions" button (click to open)
influenceFM "Actions" Button
Traffic Orders "Actions" Button: under the "Production" menu, you will find the orange "Actions" button with the following available options to choose from: View/Edit Traffic, Dub, Contnue Copy, End Early, Duplicate, Send to Storage, Print, View History, View/Add Files and !Report a Problem.
The "Actions" button is a large orange button that is located to the right of a customer
(see image below)
View/Edit Traffic - This is a quick way to access details in a traffic order and make changes. If you have already submitted the Traffic Order, you MUST use the "!Report a Problem" at the bottom of the menu.
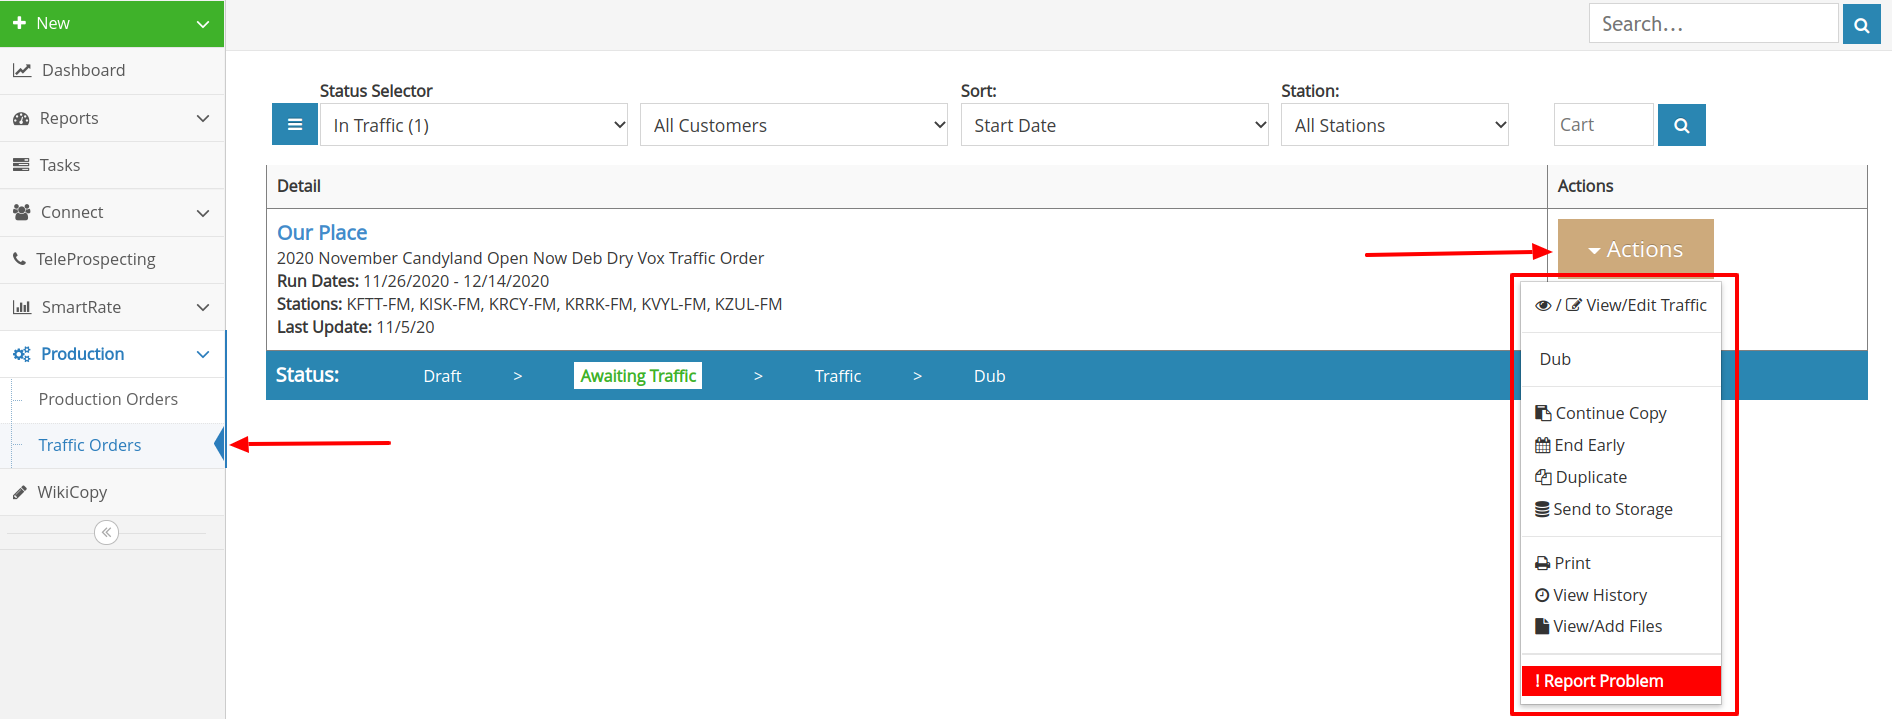
Dub - view the traffic orders that have dubbed (you can view the script from here as well)
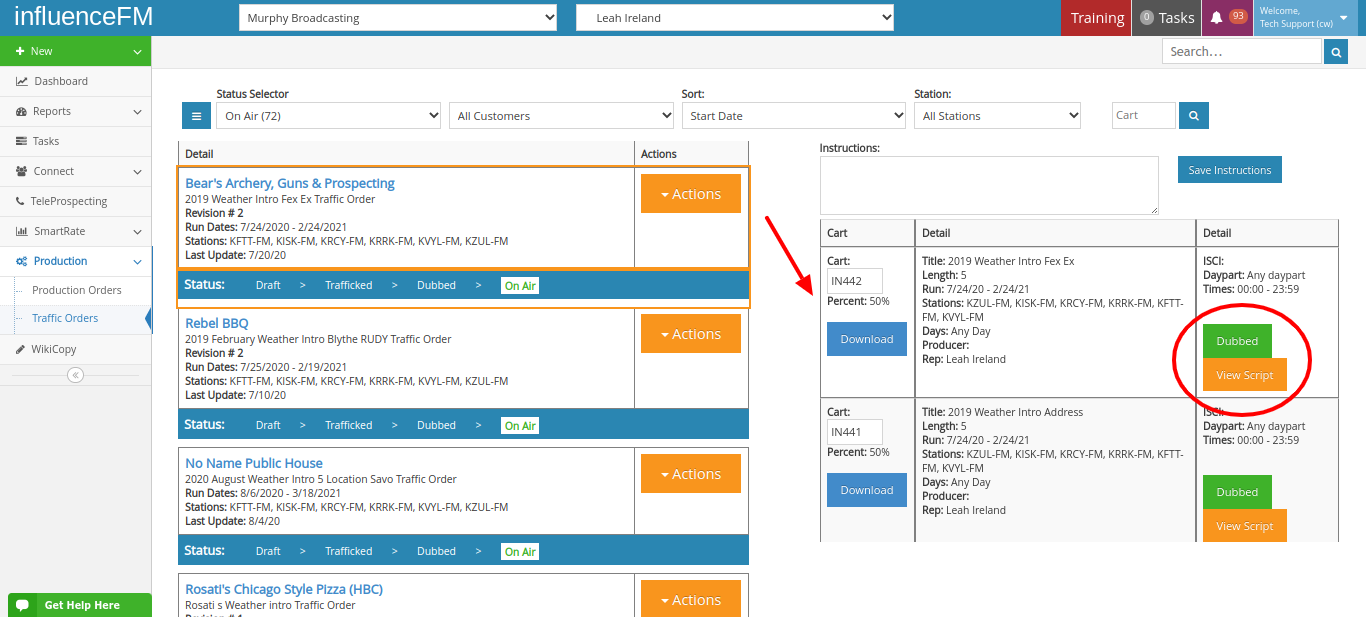
Continue Copy - If a customer renews a contract and uses the same ads, you can use this to extend the run time of the copy in the system so you don't have to remake the traffic order
End Early - This option allows you to alter the current schedule for the traffic order and end the ad cycle at an earlier time
Duplicate: duplicate this traffic order for future use
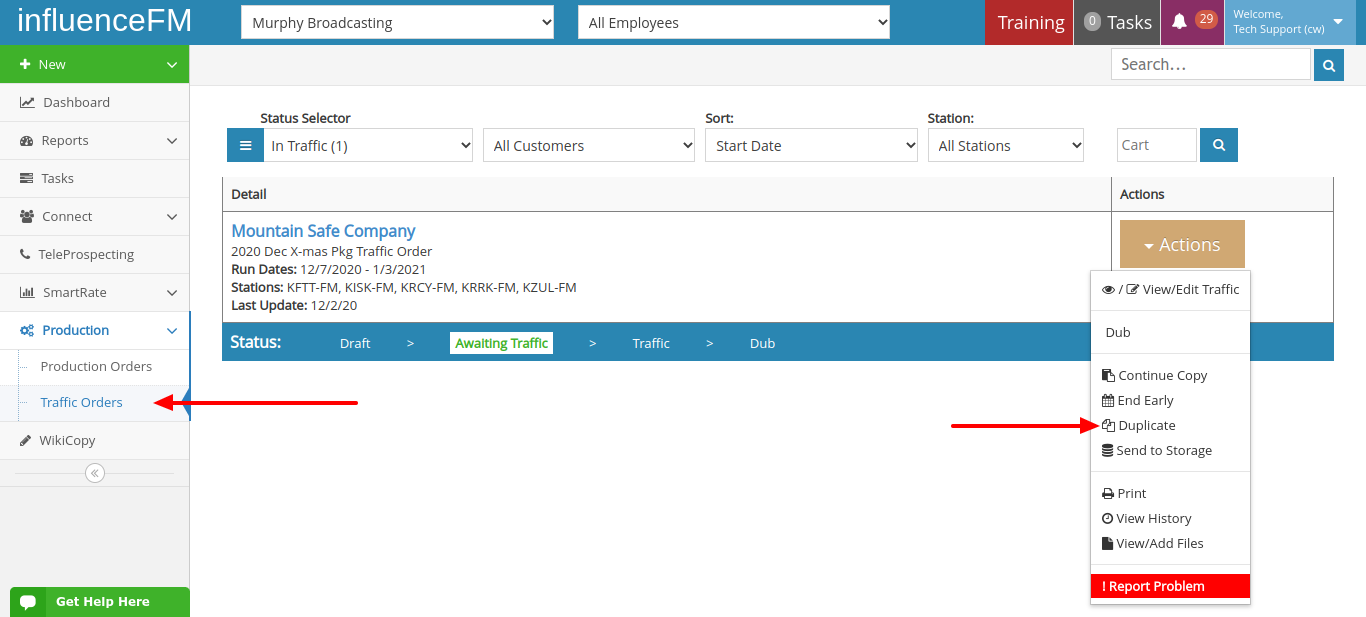
Send to Storage - Here you can send your traffic orders to storage so you don't lose old traffic orders (you may want to use this to store traffic orders for a customer with many traffic orders)
Print - Here you can print the Traffic Order to see the schedule for the ads
View History - This is a quick way to view past Traffic Orders for this customer
View/Add Files - Use this if you need to quickly add any files to your Traffic Order to make the process run more smoothly
!Report Problem - Here will be the best place to report any issues. If any changes need to be made, you must click on "!Report Problem" so everyone involved with the process knows that there is a change to the traffic order.You are better off reporting an issue than trying to edit it. There is a chance an edit would go unnoticed.
(watch additional video tutorials below)
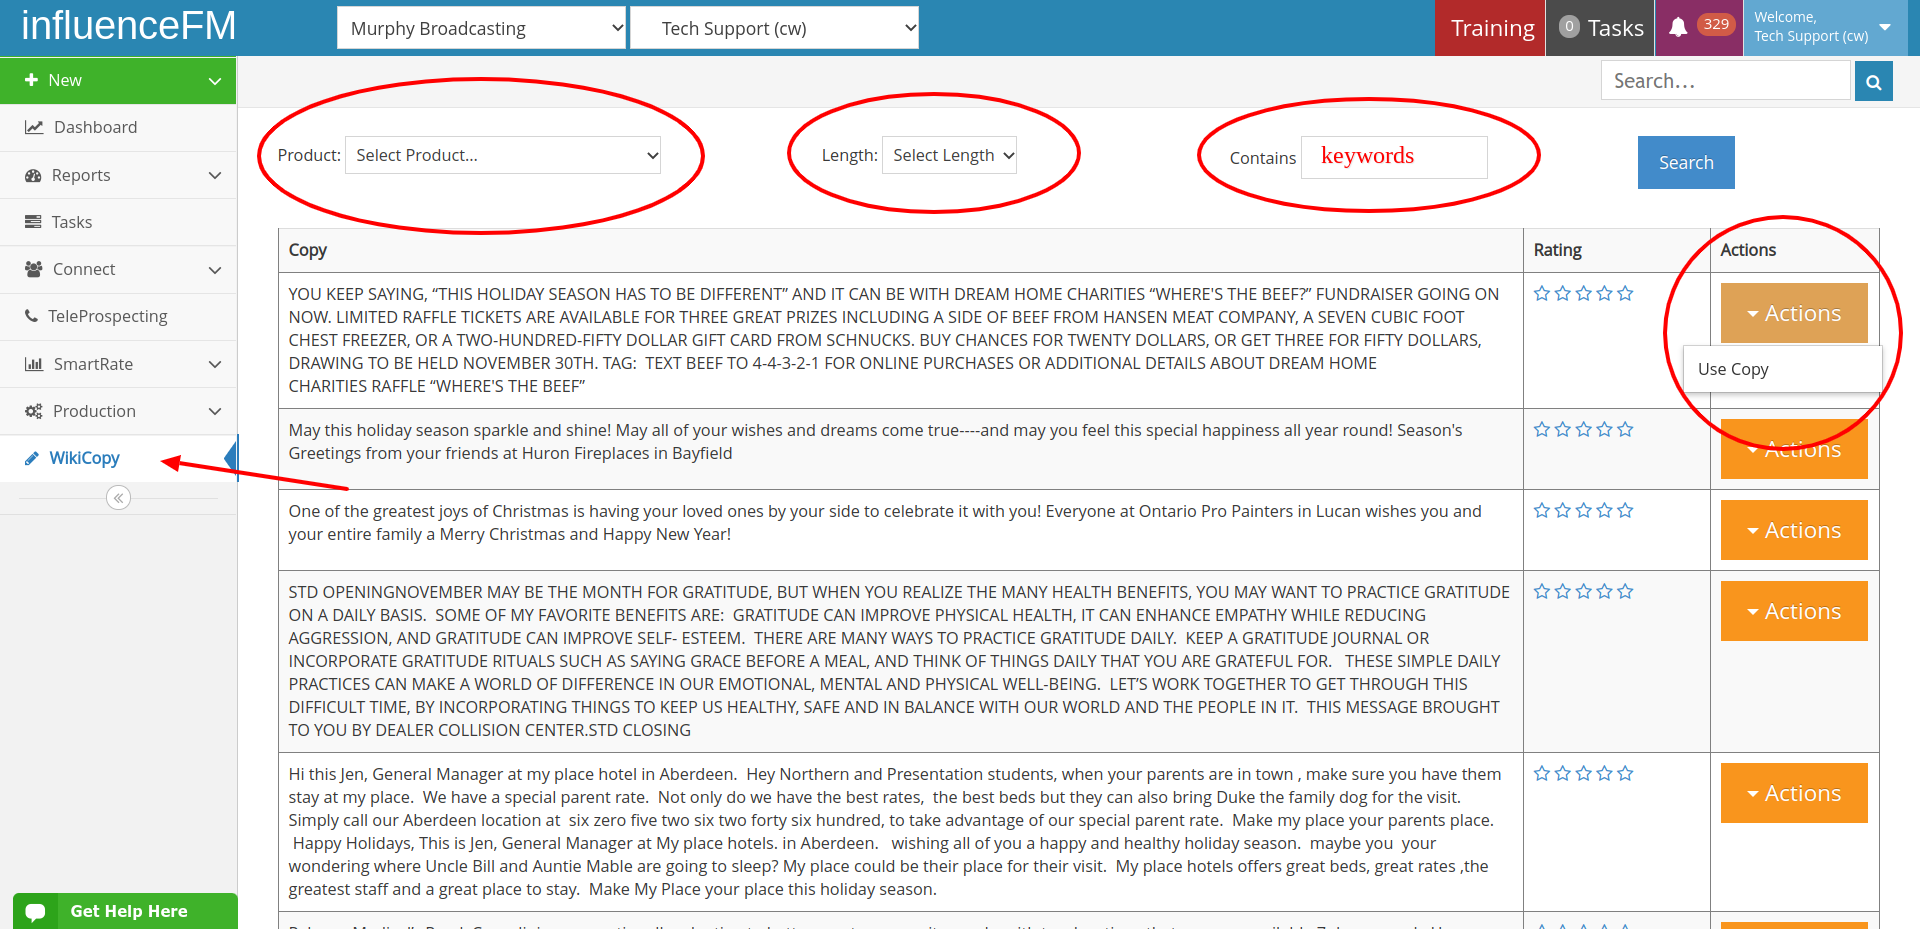
WikiCopy: "Actions" button (click to open)
influenceFM "Actions" Button
WikiCopy "Actions" Button: click on the orange "Actions" button on the right side of the page and here you will be able to use any of the 50,000 pieces of copy for your radio ads. With this feature you will not experience writers block. Use the copy provided or get ideas to use for your ad. Just enter in the product you are looking for, the spot length and key words to narrow down the search and there you will find many ideas for your ad. Enter in more than one keyword to narrow down the search even further. Click on the "Use Copy" button and auto-populate that copy directly into your production order to change and edit.
(watch the quick video tutorial below)